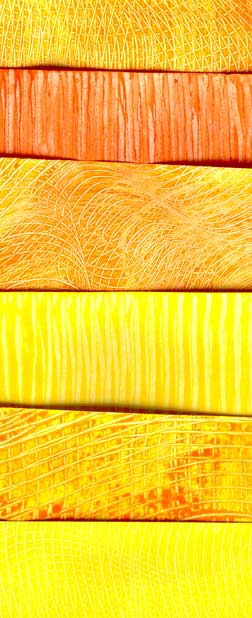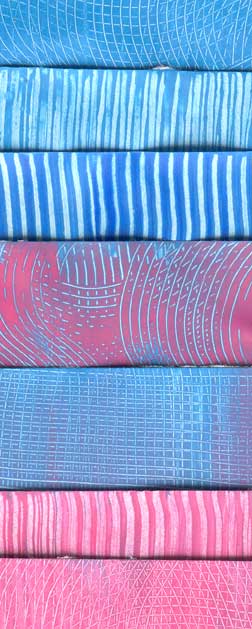
 I’ve always loved the look of homemade paste papers. However, I’m not the Princess of Patience, so the endless recipes that require boiling of starch or paste and waiting for them to thicken or set up have always put me off. Being an adventurous girl, I decided to find a faster way to get to the fun part—the actual making of the papers—while still preserving the look I love. Here’s the method I used to make all the papers shown at right (in about half an hour, excluding drying time):
You’ll need these materials:
- Freezer paper, plastic wrap, or plastic grocery bags to work on
- Masking tape
- Concentrated liquid starch: I used Sta-Flo, available at Wal-Mart. It contains no dyes, so it’s clear.
- Cheap acrylic paints: I use mostly the low end paints: Anita’s, Americana Acrylics, Folk Art. There’s no point wasting money on the more expensive paints, since they contain more pigment, and the goal here is to get a semi-transparent look.
- Cheap bristle brushes: I buy these at the hardware store. They take a ton of abuse, clean up easily, and if one gets so nasty that it’s time to toss it, I’m only out 50 cents. Don’t ruin your good brushes—get cheap ones for the dirty work. I used one brush for each color.
- Small containers: I used the small plastic containers that single servings of applesauce come in. In a pinch, paper or styro cups cut down will work, too. Mostly, you want something that won’t tip over, and that will hold your brush when not in use. I used one container for each color.
- Paper: I used two papers for the examples shown at right. One was a 28 lb. Hammermill Color Copy paper—it’s just a little heavier than your average printer paper, and not very absorbant. The other was a 110 lb. Exact Index stock—basically, cover stock. I’ve seen paste papers done on lightweight text paper, cardstock, construction paper, and watercolor paper. Pick a paper that you like, and try it—if it falls apart, don’t use it. I worked on 8-1/2 x 11 paper, but any size that is comfortable for you is fine. Some people like to work on big 24 x 36 sheets, and make lots of paper at once. You choose.
- Combs: For my papers, I used two combs. One was a cheap plastic one from the dollar store. The other was a professional faux finish comb with several different texture edges. You can drag anything through paste to make a pattern: paper clips, your fingernails, old credit cards that have been cut up. If my dog was a few pounds lighter, I’d probably drag him across the paper. I also used a sea sponge to dab color here and there. Paper towels will work for this, and so will wadded up plastic wrap.
- Paper towels (especially if you’re a messy worker)
- Newspapers, and a place to spread them out
Place freezer paper or plastic wrap on your work table, and tape it down so it won’t shift around. I worked on two 8-1/2 x 11 inch papers at a time, so my piece of freezer paper wasn’t too big. If you’re working on large paper, try using a piece of plastic dropcloth from the hardware store, or a big plastic trash bag. You want plastic rather than newspaper, because you’ll be dragging some of your paint out onto your work surface—and also, because no matter how dry your paper gets on plastic, you’ll still be able to peel it off.
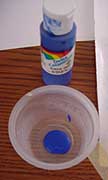 To mix up a batch of blue, I squeezed a bit of blue acrylic paint into one of my applesauce containers. This blob is roughly the size of a quarter.
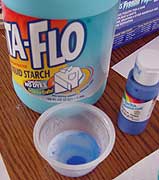 Next, I added a bit of starch—a little less than a quarter cup. This wasn’t something I measured out—I just sort of poured a little bit in. You’ll find that once you start making these papers, you’ll come up with your own idea of the perfect amount of pigment and starch.
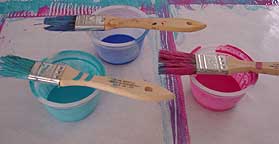 I mixed my paint and starch together using a cheap bristle brush. One brush for each color, to keep the colors from getting muddy. Notice that I store my brushes laying across the container, rather than stuck in it—that’s to keep me from sticking the brush I have in my hand in the wrong color, and also to keep my brushes from getting overloaded with paste.
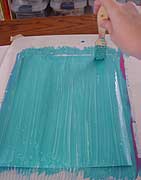 Apply some mixed up paste color to a piece of paper. Don’t be shy—this isn’t a drybrush kind of technique—but don’t get your paper sopping wet, either. A nice, liberal coat of color is what you want. Don’t worry about streaks and blobs (or in my case, bubbles from shaking the starch before I poured it). Think of those things as texture, and encourage them if they seem to look interesting. Notice that I’m painting right off the edges of my paper—that’s a good thing, because I’ll end up with color from edge to edge when I’m finished.
 I worked back and forth between two pieces of paper. After applying color to my other sheet, I came back to this one, and painted on a second, darker blue. The first coat wasn’t dry yet, so it went on as a streaky coat—that’s OK, because the streaks are going to work for me. Again, I painted right off the edges of my paper, to get a full sheet of color.
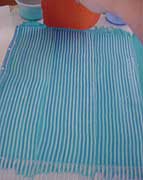 Now for some texture. On this piece, I used my faux finish comb, which gave big, bold stripes. Starting just above the edge of my paper, I placed the comb into the color, pressed lightly, and dragged in a straight-ish line down the full length of my sheet and off the edge, giving stripes from top to bottom of the paper. I repeated this until the full width of the paper was striped. Then I went back again, and dragged a second time. What you’re doing with this step is sort of displacing some of the paste, revealing what’s underneath. On my paper, that was a very pale blue, since my first blue coat had dried just a little.
In the samples below, you can see some wide stripes, and some narrow ones. The narrower lines were done with a cheap plastic men’s comb from the dollar store. You’ll notice that some of my papers have straight lines—I did those as I described above. Some have curvy lines—I simply dragged my comb in a wavy line across my paper, and repeated the curve all the way across. Sometimes, I dragged both down the paper, and then across it, creating sort of a plaid effect. Sometimes, I did the plaid effect using curved lines. This is the fun part, so experiment a little—anything you do to create a pattern on your paper is fair game. If your papers curl, pull the dry sheets over the edge of a table to straighten them, or stack them under some heavy books overnight.
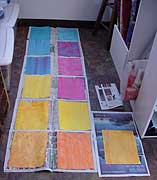 Once you have a paper finished, you’ll want to move it off your workspace and let it dry. Gently lift one corner and peel it off your plastic, then lift the corner diagonally opposite, and lift it. Place your wet paper onto a stack of newspaper and let it dry. Mine took about an hour to set up.
Everything cleans up with soap and water, but do this before the paste sets up for the least amount of scrubbing.