 I love handmade papers! I simply cannot resist buying a handful of them every time I wander through the paper section at Hobby Lobby or Asel Art. However, my wallet doesn’t love them—they can be ridiculously expensive. When I need handmade papers for large projects, or for multiples, sometimes it’s more fun and cost efficient to make them myself.
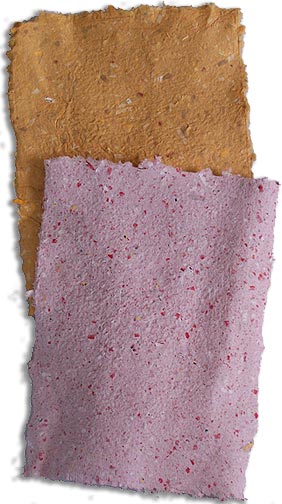
Now, those of you who read this site regularly have probably gathered by now that I am not the Princess of Patience. I don’t like messing with techniques that take forever to get to the final payoff. You’ll notice that the two papers shown at right are very textural, with lots of flecks and bumps. My way of making handmade papers is relatively fast, but to get that speed, I do end up with papers that are kind of bumpy and chunky. Finer papers require more soaking and blending, which I generally cannot find the time to do. If you want that kind of handmade paper, you’ll probably want to keep searching online for a tutorial that covers soaking and making finer pulp.
OK, enough disclaimers—here’s what you need to make your paper:
- Shredded papers
- A blender
- A frame
- Plastic screening
- Industrial stapler and staples
- Duct tape
- A plastic container that’s bigger than your frame
- Sponges
- Shop towels
- A source of water
- A place to let your papers dry
Don’t worry, I’ll explain each one of the items in this list as we go along.
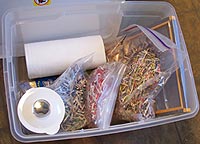 Here’s my basic papermaking kit, dragged out of my work room into the kitchen. It’s a big Rubbermaid bin that holds bags of shredded paper, my shop towels, sponges, blender and frames. Everything gets dumped out while I’m working, rinsed off outside when I’m finished, dried in the garage, and then repacked and stored in my work room again. This is the only photo containing neatness you’ll be seeing today, because this is a disgustingly messy process.
Find yourself a convenient place to work, that’s close to water, electricity, and that can be completely trashed. For me, it’s one end of my kitchen counter—next to the sink, but also right next to the kitchen door leading to the garage and outside, where there’s a hose.
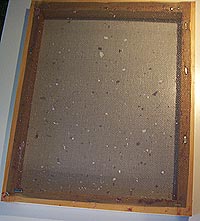 This is my basic full-sheet frame. It’s just four pieces of wood that have been nailed together, and it measures roughly 9×12 inches. This is the largest piece of paper I ever make—going larger means getting a larger vat, and making more pulp, and having the upper body strength to pull the frame up filled with wet paper pulp. However, I do know people who do sheets of 24×36 paper, using old bathtubs in their backyard. I think they’re nuts.
If you want to make your own frame, go buy some 1″ square molding at the hardware store, cut four pieces, and nail them together.
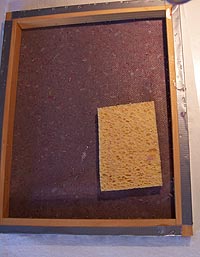
Over my frame, I’ve stapled a sheet of plastic window screening. It’s relatively taut, although with use, it does begin to sag a bit. When it gets too saggy, I pry out the staples and replace it, or learn to work around it.
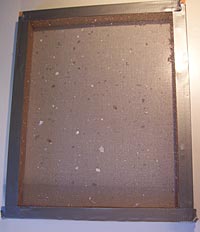 Here’s my frame after it’s been taped. I’ve run a piece of duct tape along each edge of the frame, covering the screen and staples. This gives the paper a nice feathered edge. Once the pulp runs off the screen, it doesn’t stick to your paper sheet as well, and you end up with that nice deckled edge all around. Don’t skip this part—untaped edges make for a wicked time removing the paper from the mold. You also end up with pulp where you don’t want it—very messy.
 Here are my lovely bags of shredded paper, bagged by color. I shred all my junk mail for this, plus anything else that’s laying around—envelopes, brown paper wrappings, whatever. If it’s paper, and you can cram it into the shredder, use it. I have a cheap office shredder from Wal-Mart, but if you don’t have one, ripping your papers up into tiny pieces will work.
For this lesson, I used two different bags of paper shreds:
The sort of lavender paper with red flecks was created with shredded Netflix envelopes. There’s a section of the envelope you have to remove to get your DVD out—I save that section from all my rentals, and shred them. The paper is bright red on one side, and black and white on the other, which is why my paper ends up being lavender with red flecks.
The gold paper is a mix of brown kraft paper, gold mailing envelopes, and some unprinted newsprint. I shredded all of this together into one batch.
I had about half a gallon bag of Netflix red, and a full bag of the gold. I ended up with three sheets of lavender paper, and six of gold. Your mileage may vary.
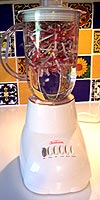 Here’s my lovely Wal-Mart blender, loaded and ready to start creating pulp. I have a cheap blender dedicated to papermaking, since this process can be hard on motors. I also get kind of grossed out by the idea of making dinner with something that’s had printing ink in it, but that’s just me.
In my blender is 4 cups of water, and two handfuls of paper shreds, which makes a full, but not packed blender. I pulse the blender a bit to get things going, and when it sounds like my motor isn’t too strained, I switch it on liquefy, and let it run about 20 seconds. More blending will get you finer pulp, and less will get you stuff that looks like barfed up confetti—either way, you’ll end up with paper pulp.
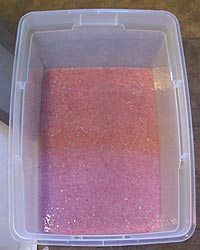 Each blender full of pulp is dumped into my vat—the empty Rubbermaid container. This size vat is ideal for my full sheets of paper. For something smaller, I use a plastic wash basin. Try to match your vat size to your paper mold—you want it to be slightly larger, but not so big that you’re making pulp forever to get going.
My half bag of shreds yielded four blenders of pulp. I stuck my hand into the vat, and decided it was a bit thick, so I added another four cups of water. This is a personal preference kinda thing—I like a little more water in my vat, so I can slosh the pulp around, and get the thickness I choose. My ideal vat feels like cheap applesauce, or really runny oatmeal.
 OK, now for the fun part! Slide your taped mold into the vat at an angle, and then flatten it out, under the gooey liquid. Your taped side is up—this will give you a flat sheet of paper.
Now, this next part is another personal preference sort of thing, so bear with me. I rock my mold back and forth a little bit as I’m raising it. Some people just pull straight up, and take what they get. I find that rocking it forward and back gives me a more even coverage of pulp. Your goal is to end up with the surface of your mold covered with an even layer of pulp. You don’t want any bare spots, or any that are too thin. Try a few sheets, and you’ll learn how thick or thin you want your pulp to be.
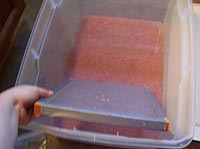
 Here’s my pulp covered mold, fresh out of the water. The pulp is really wet right now, so keep the mold flat—if you tilt it, the pulp will run right off. That’s not a bad thing, because if you decide your pulp is uneven, or too thick or thin, you can just tilt your mold sideways, and the whole layer of pulp will plop right back into the vat.
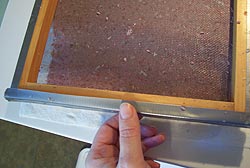
Now comes the drying. To turn pulp into paper, it has to dry. We want it to dry somewhere other than on our mold, so we’ll have to force the first part of the drying. While the mold is still hanging out over the vat, grab a sponge, and run it along the underside of the mold, against the screen. Be VERY GENTLE about this—you don’t want to press so hard that you lift the taped screen right off the frame. Squeeze your sponge out, and keep drying.
 You’ll notice as you’re drying your first mold that at a certain point, the pulp stops looking all wet and fluffy, and starts looking like it’s sticking to the screen. That’s good—your mess of pulp is turning into a sheet of paper. When your sponges stop filling with water quickly, and the mold isn’t all drippy and wet, set it down and grab a roll of shop towels.
About shop towels: they are NOT paper towels. These are much heavier towels, sold on the roll in either the paint section of Home Depot, or the automotive section at Wal-Mart. The auto ones are blue, and the paint ones are white, which is why I prefer them. If you can’t find shop towels, you can also dry papers on either Handi-Wipes, which can get really expensive, or pieces of old t-shirts. Do not attempt to dry your papers on paper towels! They’re either disintigrate, or fuse to your paper—very bad, either way.
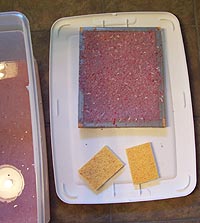
 Because my mold is big, I roll out two shop towels and lay them, still connected, on my countertop. Then I flip my mold over on top of them. Your paper should be dry enough at this point that it won’t slide right off the mold as you tilt it. If it looks like it’s sliding, stop, level the mold out, and dry it on the under side a little more.
Now that your mold is sitting on top of your paper, it’s time to really do some drying. I usually have lots of sponges going when I make paper, so I can really suck the water out. Wring the sponges out regularly, and this time, you can press as hard as you like, as long as the mold is sitting on the countertop.
Watch the back side of your screen—when the paper sheet is ready to come off, it will start to look like there are dry spots on it. It’s OK to occasionally lift the edge of your mold and see if the paper is coming off yet—if it’s not, just drop the mold and keep drying from the back side.
 The moment of truth: the paper is now ready to be removed from the mold. It just takes a little corner to start this process, so lift the mold at each corner, and see if it will start peeling off on its own. If not, sometimes more drying, or a little persuasion with your finger will start it. Once the peeling starts, I generally let gravity pull the paper off by lifting the mold very slowly, and holding down the edge of the shop towel. This also takes some practice—you have to be patient with your paper, because it’s still wet, and can be torn very easily at this point.
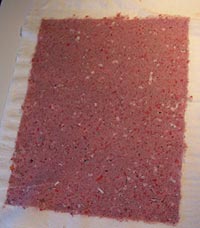 Here’s a beautiful, fresh sheet of wet paper, ready to be hung out to dry.
I’ll tell you something: this was the second sheet I did. The first sheet didn’t start peeling off the mold, so I rushed it, and ended up ruining it. I almost always ruin my first sheet—I forget that I have to be patient, and rush pulling the sheet off. That’s OK, because the pulp is still wet—I just collect all the pieces and parts that have torn off the mold, and toss them back into the vat. They instantly turn back into runny applesauce, and get reused. Don’t freak out of you don’t end up with a beautiful, square sheet of paper—if you don’t love the sheet you’ve pulled, take the wet paper off the shop towel and toss it back into your vat.
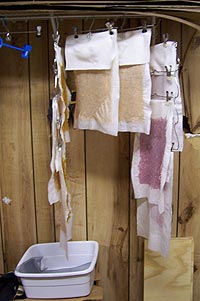 This is my drying station, out in the garage. I just clip the shop towels to a skirt hanger, and let them hang over night. Some people like to press their papers dry with an iron, but that sounds like work to me, so I let them dry naturally. If they curl, they can be pressed flat with an iron later.
Once I have my first sheet out on the drying rack, I go back and repeat dipping my mold, drying and peeling until all my pulp is used up. When your vat is more water than pulp, it’s time to either change colors, or blend more pulp. I usually go ahead and dump whatever is left outside in my garden—DO NOT pour extra pulp down your drain, or you’ll need a plumber tomorrow! Some people pour whatever is left in their vat through a mold, and then dump the leftover wet pulp into a plastic bag. These can be frozen and used later—again, that sounds like work, so I just toss it on the garden and move on.
After rinsing my vat, molds and blender with the garden hose, I can start over again.
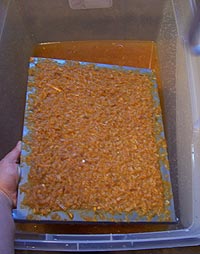 Here’s the first pull from my second color of pulp, which seriously looked like someone had barfed up pumpkin pie. The papers dried to a nice, mellow golden color. Your papers will almost always dry lighter than they look wet, and the color will be softer. It’s really hard to get vivid, intense colors using this technique. Maybe if I shredded some Astrobrite, I could get a bright color. Hmm, I’ll have to try that…


