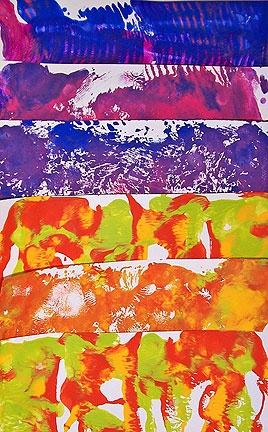
 While I was contemplating the wonderful pieces of painted paper sent to me by Lazzelle Parker, I started thinking about how I might make my own fun painted background papers when waste paint wasn’t on the menu. I tend to go for long periods without painting anything, but I can always use backgrounds for small projects. I did a little reading about monoprinting, and combined what I learned with what Lazzelle described. These background papers are the result.
A few things before we start the step-by-step instructions:
- First, I used cheap acrylic paints, available at any craft store. I did this because they’re what I had a lot of, and because of all my art supplies, they’re the most expendable. For under 50 cents, I can pick up another bottle of acrylic—but that’s not the case with some of the inks and paints I have. Having said that, there’s no reason not to try this technique with other things: metallic paints, inks, liquid watercolors, or whatever else you have in your arsenal today. Don’t feel you have to confine yourself to what I used.
- I tried two methods of paint application here: pouring the paint in squiggly lines, and combing it. I skipped over other things I had laying around: applying paint with chunky stamps, either to the glass or to the finished print, spraying with water, splattering paint in drops. These papers can be as layered and textural as you like. Don’t feel you have to stop where I did.
 Started with a sheet of plexiglass from an old picture frame, and some cheap acrylic paints. The plexi could have easily been real glass, or a piece of laminate like countertop material. The glass from a large dollar store frame would be fine. Cheap acrylics can be found at any craft store, or at Wal-Mart for less than a dollar a bottle. Don’t bother forking out more than that—the cheap paints have less pigment in them, and act more like glazes, which for this project is a good thing.
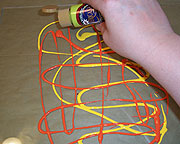
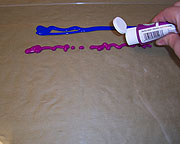
I simply squeezed out a few colors randomly onto the surface of the plexi, making sure that my paint area was larger than the size of my paper.
 For paper, I used some white index stock leftover from another project. It’s heavier than bristol, but lighter weight than cardstock. I cut the sheets in half to make them easier to handle, so what you’re seeing here is 5-1/2 x 8-1/2 inches.
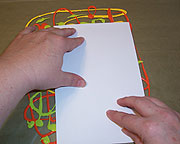
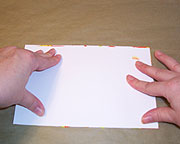
I pressed a sheet of paper onto the paint squiggles. letting the paint squeeze around under the paper. Some of you might want to roll over this with a brayer—I just pressed with my fingers.
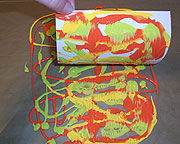 Peel the paper up from the glass slowly, rolling it back slightly. When the sheet is completely clear of the paint surface, move to another area of your work space, or move the paint surface and set it aside for a few minutes.
 This first sheet has way too much paint on it, so here’s a way to quickly make a second print: lay your painted sheet down on your work surface, paint side up, and press a second piece of paper down on it.
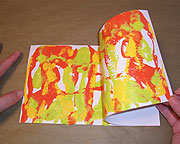 Roll your second sheet off your first one, and you should have a mirror image of your original print. Set these pieces aside to dry. I usually put mine on some newspaper, away from where I’m working so I don’t disturb them.
If your glass seems to have plenty of paint on it, go ahead and make more prints. At a certain point, it will either start to dry up, or you will have used up most of the paint.
 If you have paint around the edges of your paper pieces that isn’t being used, you can smoosh it to the center of the glass with a brush, and create another print with a totally different look.
 Just press your paper down onto the smooshed paint to create your next print.
Once you’ve used up your paint, clean your surface by rinsing it with water. I usually do this by wiping it down with paper towels, then squirting it down with the hose in the backyard. Dry the glass well if you’re going to move on with other colors.
 While I had the paint out, I decided to try some prints that looked more like the paste papers I made for an earlier article. I squeezed out a few lines of paint onto my glass.
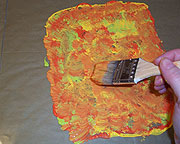
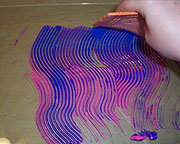 I dragged a comb through the paint to create lines. Mine was a faux finish comb, but a plastic hair comb will create a similar effect. So will cutting a piece of cardboard or an old credit card with pinking shears.
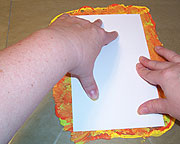
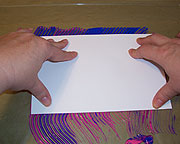 Press the paper down onto the paint. I found that this technique needed more paint than I expected, and that the lines weren’t as defined as they were on paste papers.
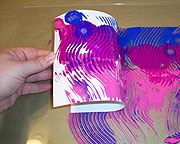 Roll the paper back from the paint surface and set it aside to dry.


