 I love making little books out of unusual materials. A couple of months ago, I was working on a vintage nudes deco, and I wanted to play with a plain brown wrapper theme. (For those of you who are too young to remember this, magazines with risque content used to travel through the mail with a plain brown wrapper around them, to keep them safe from under age eyes.) I found some little brown paper bags, and decided to make my deco from them, tucking cards inside each one that the other artists could decorate with their risque vintage nude artwork. To flaunt the bags rather than the book construction, I chose to use an accordian spine. This construction method works well if your pages are made from something that you want to show off, without obstruction: tags, envelopes, and bags.
To make this book, you’ll need:
- Plain brown paper – I buy this in the packaging and shipping section of my local mega-store. It’s cheap, and it makes great altered book backgrounds.
- Small brown paper bags – Look in the party section of the same store. Mine were about the size of my hand, but these instructions will work for any size bag—even those great big ones that your groceries come in. I used six bags for my book. Use as many as you like.
- A glue stick – I use inexpensive glue sticks from Office Depot.
- A ruler – My general purpose ruler is a clear quilter’s ruler with red lines on it. I started life working with fabric, and some tools just carried over to my paper crafting habit. This ruler is one of them.
- Scissors or a paper trimmer
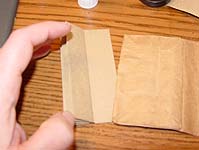
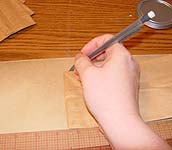 Cut a strip of brown paper that’s the full width of the paper, and about as high as your paper bag is wide. I did this by cutting one straight edge, lining my bag up against it, and marking off the height—it was just slightly more than 3-1/2 inches for my little bags. Cut this strip with scissors or a paper trimmer.
 Fold your paper in an accordian. For my smaller bags, I used a 3/4 inch spine. For larger bags, you might want to make it a little wider. Fold your accordian absolutely straight. I did this by lining up the short edge of my paper against the 3/4 inch mark on my ruler, and folding the paper against it.
 Fold back and forth, keeping your paper straight and your folds uniform, to create an accordian. I usually do more folds than I need, but for my six bag book, I’ll need to do at least six folds in each direction. If you’re not sure how many folds to do, simply fold up your whole strip this first time, and trim away what you don’t need later.
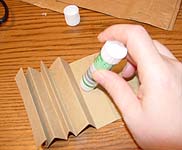 Lay your accordian out flat, and apply glue to alternate folds. Press each glued fold to the piece next to it to create tabs. You’ll see as you do this that your tabs are creating a spine—they’re all right up against each other at one point, and flare out from there.
I should probably mention that some people prefer not to glue their accordians closed like this—they leave them open, which makes the book kind of boingy when it’s finished. Sometimes, they’re tied closed with ribbons at the spine instead of glued. I’m not much for the frou-frou, so I went for clean and simple here.
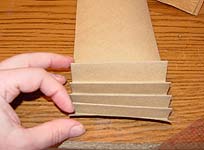
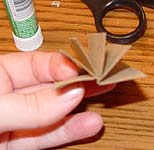 Since that last instruction was not crystal clear, here’s a photo of what your finished spine looks like. This is exactly the right size for my six paper bags—six tabs.
 Now glue your bags in place. Each tab gets one bag glued to the front of it. This way, the tabs will be behind the bags. I’ve seen people do these with brightly colored spines, glued to the front side of their pages. I don’t really care for that look, so mine go behind, and generally match the pages of the book.
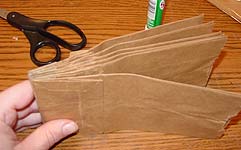 Here’s a top view of a book with all its pages glued in.
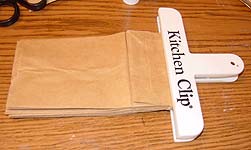 For me, this is the most important step: clamp your work, and let the glue set until it’s completely dry. This may seem like overkill, but I want this book to hold up through a year’s worth of travel all over the world—this way, I’m sure the pages will stay glued.
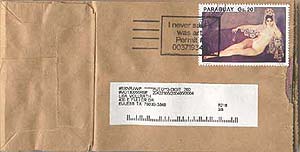
Once the book is dry, decorate it. In my example, I simply glued an address label from one of my magazines on the front, added a naughty postage stamp and a cancellation, and then tucked a decorated card inside the bag.


