
Here’s what you’ll need to make the example above:
- Patterned paper – 1 sheet each of 3 different prints
- Vintage photo to fill iris
- Paper trimmer – I use the Fiskars 12″ personal trimmer
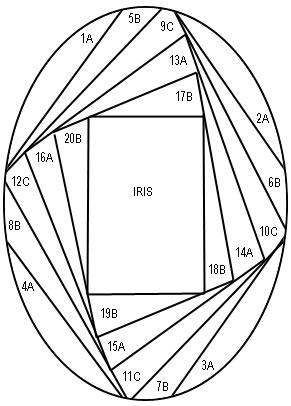
- Pattern – print the pattern shown below
- Transparent tape
- Cardstock – 1 sheet for aperture
- Scissors
How to make it:
- Using paper trimmer, cut patterned paper into 1-1/2″ strips.
- Fold strips in half lengthwise, creating 3/4″ strips with one folded edge. Assemble strips into bundles of A, B and C papers, one bundle for each design. Set strips aside for the moment.
- Print pattern below. The easiest way to do this is to save it to your local drive, and then print it from any graphics software. The pattern is for a roughly 5 x 4 inch oval, but you can resize it to any measurement you wish.
- Cut pattern out around outer edge. Position pattern where desired on cardstock and trace around outer edge. Create an opening in the cardstock by cutting away traced shape. This will be your aperture.
- Turn cardstock over. You will be working on the wrong side of the cardstock to create your design. Position pattern in aperture, and lightly tape both pattern and cardstock to work table.
- Lay out your folded papers in piles of A, B and C. It’s very important that you keep your letters straight!
- Start working your pattern with section 1A. Place the folded edge of the paper A against the 1A line closest to the center of the aperture, covering section 1A completely. Tape in in place, and trim excess length away. Do the same thing with section 2A, 3A and 4A. Now pick up paper B, and tape pieces over 5B, 6B, and so on. Keep following the pattern, working your way around the oval, one paper at a time.
- When all sections have been covered with papers, your design is almost complete. Gently remove your cardstock from the work table and turn it over to reveal your iris, with a rectangular opening in the center. This will act as a frame for your photo. Slide the photo into position behind the iris and tape in place.
Tips:
- Lightweight papers such as origami paper give the most satisfying results in iris folding. Try to avoid heavier scrapbooking papers or cardstock for your folds.
- I generally cut my cardstock piece a little large, work my design, and then trim it down to size.
- Iris folds make great card fronts. Fold a piece of cardstock in half and mount the finished iris design on the card to create a finished back for your design.