This week, I’ve been reading messages from people trying to alter metal tins. The most often asked question has been how to get paint to stick to them. The key to this is preparation. You can’t just slap some random paint on an Altoid tin and expect it to stick.
I’ve prepped tins three different ways:
 Metal Primer
This is pretty simple: go buy a can of metal primer spray paint, and spray a light coat on the outside of your tin. Light coat means you’re just turning the tin grey, with maybe a tiny hint of the original tin design peeking through. It does not mean spray it until the paint runs down the tin in little grey rivers! The paint you’re after will be labelled metal primer, and it’s usually available wherever spray paint is sold.
Once you’ve lightly sprayed the outside of your tin, let it dry over night. Seriously. Don’t play with it for a full 24 hours. The tin should be completely dry, and a little rough to the touch. If it’s tacky, don’t play with it yet—you live in a humid place, and it needs more drying time. This happens to me when I prime things here in Texas during the summer.
When your tin is dry and feels good, it’s ready for paint. Use metal paints, spray paint, or acrylics. Paint lightly, and let the coats dry completely. Try to use as few coats and as little paint as possible, since each layer makes the tin just a little fatter, and will make it just a tiny bit more difficult to open and close. When all your paint is dry, seal your tin with either a spray sealer or a brush on product like Diamond Glaze. As before, make sure you apply your sealer lightly, then let it dry completely.
Oven Cleaner
This is a technique best done when it’s nice outside. Please don’t try this on a rainy or snowy day.
Get yourself a large paper grocery bag, and a can of oven cleaner. Open your tins, and spray the exterior. Place them in the grocery bag. Fold the end of the bag over a couple of times to close it, and set the whole thing out in the sun for the afternoon. Rinse the tins. They should be pretty bare when you’e finished.
Barbeque
There are an infinite number of variations to this technique. Some people swear that only “real” fire will work. I don’t have a barbeque or fireplace, which is just as well, because I’d rather not do this where the fumes get into the house or into anything coming close to my food. This is what I do:
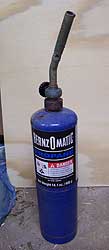
 This is a propane torch. You can buy the gas (which is the lower, blue part) and the torch separately at Home Depot or Wal-Mart. I bought my first ones packaged together, and now just replace the gas cans when they get empty.
(This particular brand gets my vote for silliest product name: Bernz-O-Matic.)
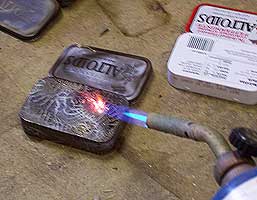
To make fire happen with this item, you just rotate the little black dial until you can barely hear the gas hissing, and then wave a match in front of it. Actually, I use one of those long fireplace wand lighters, because I’m not usually smart enough to make matches work quickly.
Once the gas is lit, and you see a little blue cone burning from the torch, you can dial up the gas, from slow to nuclear.
Did I mention you should do all of this outside? Unless you’re a plumber, please don’t play with propane torches in the house. I do all this out in the garage, with the doors open. I have a nice, non-flamable concrete floor out there.
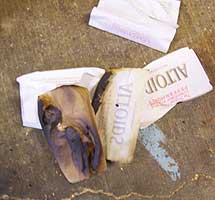
Open your tins and place them on a non-flamable surface. Apply the torch to them, and watch the paint catch fire. It really does flame occasionally, so beware. Don’t stick your nose over this, because it lets off fumes.
I usually line up half a dozen tins, and flame them all in a row. By the time I’m done burning the paint off the last one, the first one is cool enough to flip over. Be sure to burn off all the paint, so that all surfaces have ash on them.
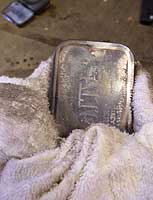
 Once everything has been burned, I wipe down the tins with a soft cloth, to remove the ash. I have old scrap towels laying around. If you have car wash towels in the garage, steal those. Be careful, because the tins do get very hot. Don’t stick your fingers onto the metal.
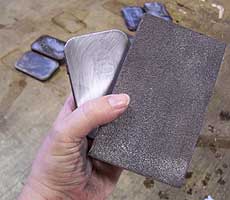
My last step is usually to just give the tins a little brush with a sanding block. That roughs up the surface just a little, and makes them shiny again. If you like the dullness of the burned tin, you can skip this part.
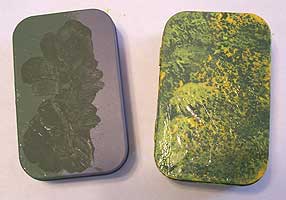
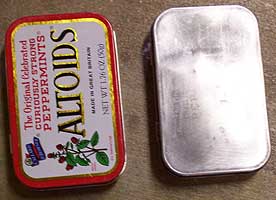
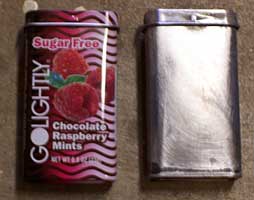
Below, you can see the original tins I burned, and their new, bare look after burning. Nice and shiny, and ready to color. Bare metal tins can be colored with inks—dribble some alcohol inks on them, and see what happens.

 Did I mention you should remove the contents of your tins before you burn them? Clearly, I shouldn’t be playing with fire today…


