
I just can’t seem to throw away glass bottles. Have you noticed that they’re becoming a rare breed these days? So many things that used to come in glass bottles are now packaged in plastic or paper. It’s sort of sad, really. I occasionally find myself thinking that I’ll just go buy a bottle of something that will be the perfect size for my latest craft project, only to discover that the item I’m thinking of now comes in a cardboard box. Glass bottles make me feel a little nostalgic, and I just don’t have the heart to toss them. The result? I have them coming out my ears.
As a surface, glass is remarkably receptive to various media, including paint. Glass can be painted with craft acrylics, as long as it’s adequately cleaned and free of grease, and properly sealed before the paint is applied.
A Simple Holiday Solution
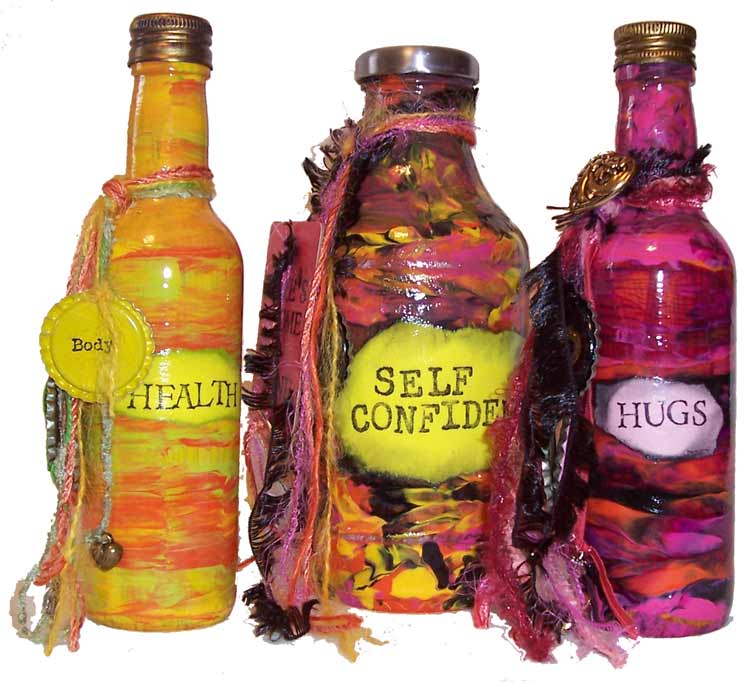
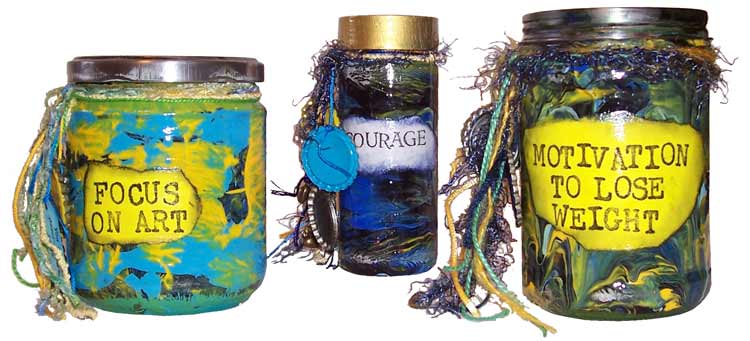
One year, I joined a holiday gift exchange put together by some artsy friends, who stipulated that we could only exchange things we made by hand. Various friends in the exchange put intangible items on their holiday wish lists. How do you give someone who is hundreds of miles away health, self-confidence or courage? These colorful painted bottles were my solution.
Materials
To make your own marbled bottles, you’ll need:
- Clear, dry glass bottles. I found that straight, clear, smooth bottles worked best.
- Acrylic paints. I used three colors for each bottle. Cheap paints are best, since this process is a little wasteful.
- Plastic sheeting or freezer paper.
- Paintbrushes. I use inexpensive bristle brushes from the hardware store.
- Clear glaze. I usually use glazing liquid or gloss medium. Diamond Glaze would also work well.
- Paper scraps for labels.
- Alphabet stamps.
- A heat tool or embossing gun.
- Assorted dye and chalk inkpads.
- Fibers, yarn or floss.
- Charms.
And, depending on which type of lid you do:
- A propane torch.
- A sanding block.
- Alcohol inks and an applicator.
OR:
- Plastic primer.
- Metallic acrylics.
How To Paint the Bottles
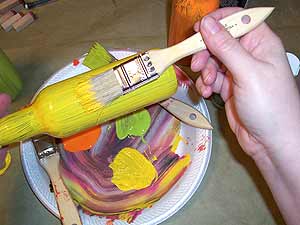 Base coat your bottles with one color of acrylic paint. I found it really didn’t matter too much which color I used, since I covered most of it. When in doubt, use the lightest color from the ones you’ve chosen to use to marble that bottle. Let the base coat dry completely.
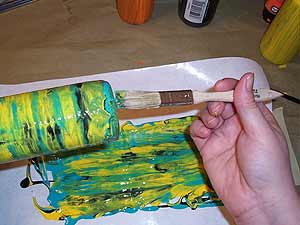
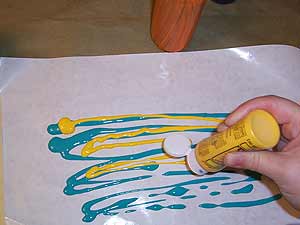 Squirt lines of paint onto plastic or freezer paper . Make your lines long enough to roll the bottles all the way around, and tall enough for your largest flat areas.
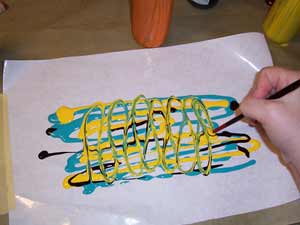 Use a skewer or the end of a fine paintbrush to squiggle through the paint a bit. Don’t mix it too well, or you’ll end up with muddy colors. You just want to break the lines up a little.
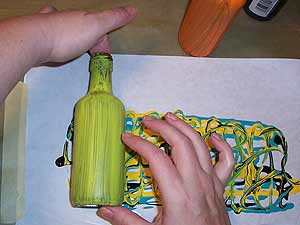 Starting at one end of the paint, roll your bottle across the paper, over the paint. I found sticking my finger or a pencil in the neck of some bottles helped them roll more smoothly.
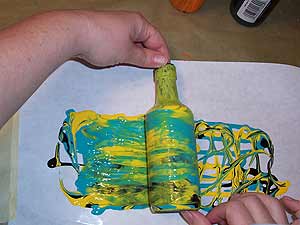 Keep rolling all the way around the bottle, then lift the bottle away from the paint. If you like, set it aside , and roll another through the same paint.
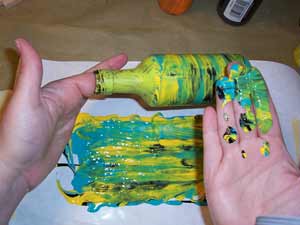 I found that tapered bottles didn’t get any marbling on the neck. My solution was to pat my hand in the paint, and wrap it around the neck. It’s messy, but effective.
 Don’t forget to paint the bottom! Bottles tend to taper just a bit at the bottom, so they miss getting marbled. I just added a little paint from my plastic sheet around the bottom.
Set the whole thing aside on a plastic sheet to dry.
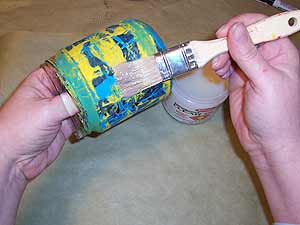 Once the bottles are dry, give them a good, thick coat of clear glaze to even out the surface, and make them shiny. Let this coat dry completely, out of the reach of anyone who might be tempted to poke at it, or shed on it.
How To Make the Labels
I chose to make sort of simple, handmade labels for my bottles, but along the way, I contemplated making labels on my computer, or stamping them using commercial label stamps. Whatever you choose, I know it will look great.
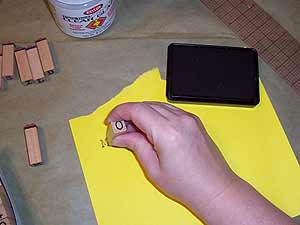 On a scrap of paper, stamp your message. Set the ink with a heat gun. You might also choose to use embossing powder while you’re setting the ink.
Tear around the words, and edge the label with chalk inkpads.
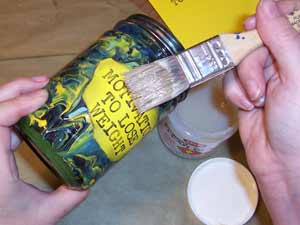 Apply the label to a glazed bottle using glue, or another coat of clear glaze. Let the label dry completely before handling.
Painting Plastic Lids
I’ve always given plastic the big thumbs down as a surface. One day, jewelry artist Barbe Saint John whispered the words that set me free: plastic model primer. This is the stuff that toy model builders use to prime their plastic before painting, and it works like a charm.
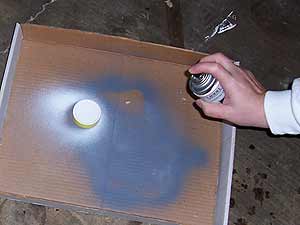 Spray the plastic lid with plastic model primer, and let it dry.
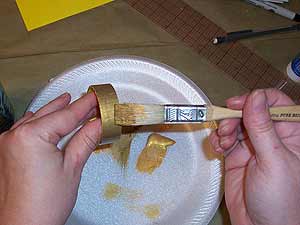 Paint the primed lid with acrylic paints. I like to use metallic acrylics for this.
Let the paint dry, and then apply a coat of clear glaze.
Burning the Finish Off Metal
My way of dealing with metal lids and tins is to burn off all the printing, and get them back to their original metal. This process is not for the faint of heart!
A few things to know:
- Burn on a heat resistant surface. I do this on my concrete garage floor.
- This process emits some serious fumes. Work in an adequately ventilated area, and keep your nose away from the smoke.
- You’re using a torch. That means it’s hot! Don’t handle things that have been burned until they’ve cooled completely.
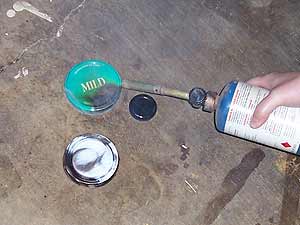 Burn away the finish using a torch. Just put the flame against the lid, and let the finish burn and turn to ash.
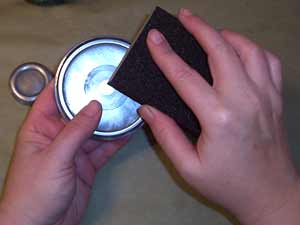 When the pieces are completely cool, use a sanding block to remove the ash, and to raise a shine. Stop when you feel it’s shiny enough.
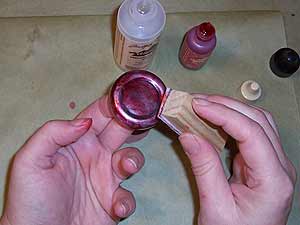 To color the metal, drop a little alcohol ink on it. Blot the ink with an applicator, and a little alcohol to spread the color around.
Let the lid dry completely. If you wish, apply a coat of glaze, to seal the color.
Filling & Decorating
Since these bottles are painted and decorated only on the exterior, they’re safe to use as containers for candies, mixes, or bath salts.
I did some very simple decorating of my finished bottles. I tied fibers around the necks, and tied on charms, bottle caps, tags, and Formica chips stamped with messages.
This article originally appeared in the January 2006 issue of The Monthly Muse.


