 For months now, I’ve been getting requests for information about how to work with beeswax. I vowed I wouldn’t start writing about this until I had something original to say, since Claudine Hellmuth has covered the technique so well in Collage Discovery Workshop. If you want a good jumping off point for a variety of collage techniques including wax collage, go buy this book.
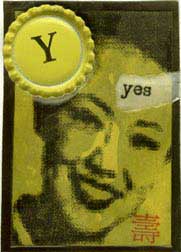
OK, having said that, this week, I had to do a set of 26 artist trading cards for an ABC swap on the Beeswax Collage list. I chose the letter Y (I’ll bet you guessed that already), and set myself up to assembly line my cards. Here’s how I did them:
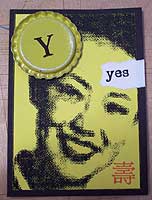 First, I collaged my ATC. This card uses a black cardstock background, a face laser printed on yellow Astrobrite, a word laser printed on white paper, a flattened yellow bottle cap that’s been sanded and stamped with pigment ink, and a rubber stamped symbol applied with red dye ink. All of this was assembled using standard collage techniques—gluestick for the papers, and E6000 for the bottle cap. I set the finished set of cards aside for a couple of days to make sure they were dry and flat.
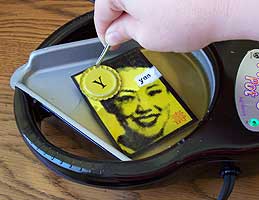
To apply the wax, I melted filtered beeswax in a Ranger Melting Pot. When I first started doing wax collage, I tried using a small potpourri pot to hold my wax, but it just didn’t get hot enough. I recently switched to a Melting Pot, and it’s much more effective at melting the wax and keeping it at an even consistency—when I add more wax strips to the pot, they melt right away, with no lumps floating around.
 One really important thing to know about beeswax is that it has a relatively low melting point. Don’t crank your heat up and leave the wax unattended. If it starts to smoke, it’s way too hot, and you’re in danger of having a big fire on your hands. Covered, my wax melted at under 200 degrees. Uncovered, I eeked the temperature up just a bit, to compensate for the fact that the surface was cooler. Seriously, don’t overheat this stuff.
Filtered beexwax is usually sort of amberish stuff. Some folks like white beeswax, but so far, I haven’t felt the need for it. This dipped technique uses so little wax that there’s very little color shift because of the amber tone of the wax. Some of my larger pieces that build up multiple layers of wax do show a little bit of an amber glow, but I like that.
All I wanted to do with these cards was give them a quick coating of beeswax, so I simply grabbed the ridge of my bottle cap with a pair of tweezers, and quickly pushed the card into the melted wax.
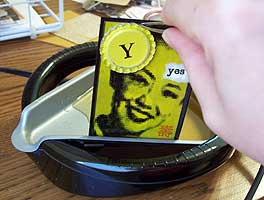 I immediately pulled the card out of the wax, and pressed the front of the card against the side of the Melting Pot. This let the excess wax run off, back into the pot. A couple of cards needed a quick blast with my heat gun to remove little runs and drips—I did this right over the pot, letting the excess wax run back into the pool to be reused. Again, be sure to watch your temperature when heating the wax—if you see little whisps of smoke, you’re getting it too hot. Hold your heat gun farther away, and keep it moving.
Once the card was ready to dry, I placed it on a flat surface, on a piece of waxed paper, and let it set up and cool for about ten minutes.
This method allowed me to use laser prints of images effectively, without scraping any of the toner off, which I’ve found to be a problem using brushes and irons.


