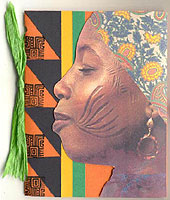
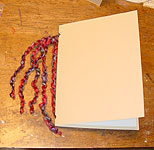
 Recently, I read a post on DecoNation from someone who was bemoaning the fact that although there are lots of nice photos of decos scattered around the Internet, there really aren’t many descriptions of how they’re made. Here is my recipe for the simplest deco I make—in fact, it’s exactly how I made the deco shown at right:
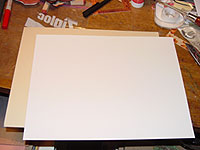 Start with a sheet of colored cardstock, which will be the cover, and a sheet of white bristol, which will be the pages. (Both are 8-1/2 x 11 inches.) I know some people like to use recycled paper for deco pages, but I tend not to do this. I enjoy making little booklets that are lovely when they’re sent out, and for me, that means covers and pages that match, or at least don’t fight with each other. I also tend to use heavier stock for pages rather than regular bond. I like to give the artists down the line something substantial to work on, and it pays off—my booklets tend to come home with pages that are nice and flat, rather than rippled.
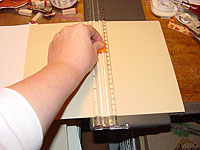 Cut both the cover stock and the page stock in half, to create two colored pieces and two white pieces that are all 8-1/2 x 5-1/2 inches. For cutting, I usually use a Fiskars paper trimmer rather than scissors, because it gives me a nice, clean cut. It also allows me to cut without marking—I just line up the paper on the measuring guide, and cut to the correct size.
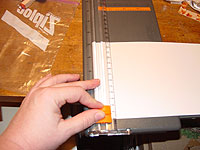 Usually, I want my pages to be slightly smaller than my cover. I trim 1/4″ from one short side and one long side of the white page stock, to create two pieces of paper 8-1/4 x 5-1/4 inches. This slight trimming is just enough to keep the pages from peeking out of the cover when the finished deco is closed.
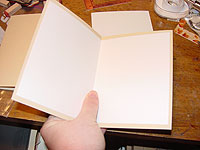 Fold one piece of colored cardstock and one or two pieces of white page stock in half. Nest the folded page stock inside the cover as shown.
One piece of cover stock and one piece of page stock will create a deco with a front and back cover, and six internal pages to decorate (counting the inside front and inside back covers as pages). One piece of cover stock and two pieces of page stock will create a deco with a front and back cover, and ten internal pages to decorate (counting the inside front and inside back covers as pages). I am not the Princess of Patience, so I tend to do decos with fewer pages that will come home quickly.
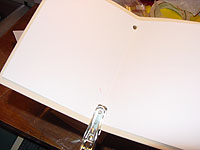 Using a standard hole punch from the office supply store (or any other hold-making implement you can get your hands on), make two holes along the fold of the deco. These can be made as far apart or close together as you wish. I tend to space mine farther apart, as shown.
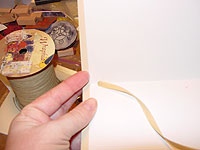 Thread something through the holes to hold the deco together. In this example, I used paper raffia, from the gift wrap section of my local craft store. Starting from the outside, bring the strand up through one hole, across the center of the deco, and down through the second hole.
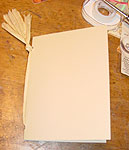
 Tie the raffia in a knot on the outside of the deco. Make it snug, but don’t pull the strands too tightly, or you’ll tear the lower hole. Trim the ends to a pleasing length.
 Taa-daa! This deco is ready to be decorated, labelled with my address, and sent out into the world. Usually, I decorate the front cover, add my address info to the inside front cover, and add a label to the back cover enouraging the last person to receive it to send it home to me. All of this information is covered in Decos 101.
 Using the remaining piece of cover stock and page stock, I made this deco—same construction, but instead of paper raffia, I used yarn to hold the deco together. Embroidery floss, twine, ribbon—well, and type of fiber at all—can be used to tie the deco. Match your ties to your decorations.


