 Some of the girls in ARTdecos, myself included, like to do dark work occasionally. We decided to organize ourselves into a dark deco round robin. When the list of sign ups was complete, we were left with 15 participants, and most of the group was in agreement that they wanted all 15 artists represented in each booklet. That means each of us has to produce a deco that contains enough pages for fourteen other artists’ work. That’s about twice the size of our usual decos—more than twice for mine, which usually only contain 4-6 pages.
For those of you who have never passed decos, they have to be pretty sturdy to survive their many trips through the mail. Although the artists in ARTdecos are a very careful, respectful bunch when it comes to handling each other’s art, you just can’t avoid the beating that 15 trips through the mail will give a paper booklet. There are some things you can do to minimize damage, though, like making the deco compact, and avoiding too much dimensional embellishment.
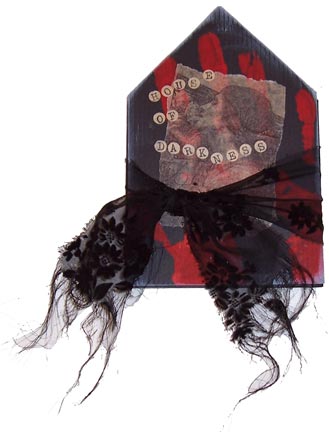
OK, so it had to be big, it had to take a beating, and it had to have some sort of dark theme—that was my assignment this afternoon. Here’s what I came up with. To make this deco, you’ll need:
- A sheet of 12 x 12 black cardstock
- Two sheets of 8.5 x 11 cardstock for pages
- White waxed thread and a needle
- A gluestick
- A paper trimmer or scissors
- A pencil and a ruler
- Your choice of stuff to decorate with – I used red acrylic paint, an Oxford Impressions image stamped on tan tissue paper, some letter stamps, and a shred of black embossed chiffon
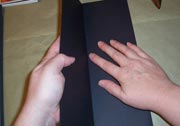 First, I folded my black cardstock in thirds. This will make a tall, skinny folded piece that’s roughly 4 inches wide.
 Next, I cut my folded piece in half, to make it six inches tall. In retrospect, it might have been smarter to cut the height first, and then fold in in thirds. I was playing with size, so I now have the makings of a second deco cover. This happens a lot at my house…
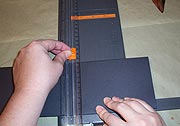
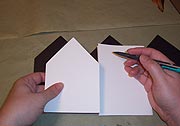
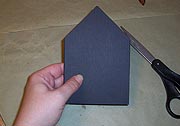 Now I cut my rectangle into a house shape. I measured down two inches from the top, and made tick marks at the sides of the deco, and then made one mark at the top center. I drew lines from top center out to each side, and then cut using my paper trimmer. I can’t cut a straight line with scissors to save my life—don’t let the photo fool you. I set my cover aside for now, to work on the pages.
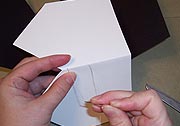
 I folded my white cardstock in half, to make two folded pieces that were 4.25 inches wide. I cut them in half, so that I had four folded pieces 5.5 inches tall x 4.25 inches wide. Now comes the tricky part: I nested two pieces together. Because they’re made of cardstock, the interior pages will always stick out from the exterior ones. Since they were too wide for my booklet anyway, I could trim the pages down and solve this problem at the same time. I stuck my nested pages into the paper trimmer, and cut them down to 3.75 inches wide.
 I did the same cut down to create the house shape that I did on my cover: measure down two inches, do two marks on the sides and one at top center, and then connect the sides to the center and cut on the lines.
 I stitched my two sets of pages together using waxed thread and a needle. I make four holes in my fold to sew small booklets like this one. The needle goes in just to one side of the center of the fold, then up about an inch from the end of the booklet. It goes in again about an inch from the other end, and back up to the other side of center.
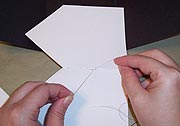 I tie a knot to finish my stitching. The tails of the knot, and the long stitch that shows at the back will all be hidden when the pages are glued in.
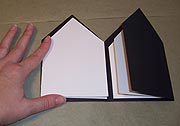 I glued my two sets of pages into the book, facing each other.
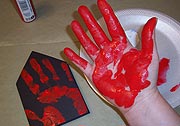 Yes, I really do apply handprints with my hand. I just squirt a little acrylic paint on, squish it around, and slap it onto my surface—and then immediately wash my hands, because red in particular will stain the skin a bit. Washing quickly avoids having to explain to your dinner companions why your hand is so red…
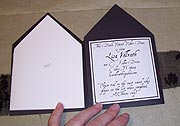 Inside the cover, I applied my contact information.


