 Lately, it seems that everyone has questions about wax collage. If you’re looking for a good overview of some basic wax collage techniques, they’re in Claudine Hellmuth’s Collage Discovery Workshop. This book gives the basics that I’m skipping over in my lessons—they’re Claudine’s techniques, so you should get them from her. Go buy the book.
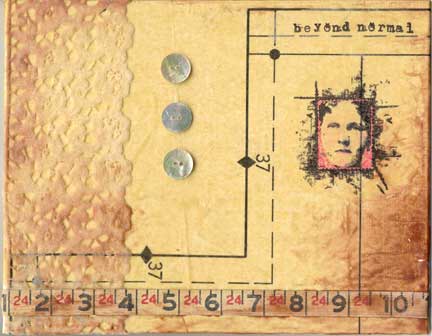
This lesson is sort of a step-by-step on making the collage at left. There are some things I do that aren’t in Claudine’s book, so I’ll talk about those in depth.
About beeswax: I use filtered wax, purchased in blocks of various sizes on eBay. Some people like the white wax, but I prefer the amber—it gives just a slight mellow tone to most pieces that I really like. Both types can sometimes be found in craft stores, but the price is often much higher than buying in bulk online.
Beeswax has a really low flash point. When I talk about heating it various ways, please remember that I’m using very low heat. Try to keep the wax under 200 degrees at all times. At the first sight of little smoke whisps, stop heating your wax, because that’s a sign that it’s getting too hot. Hot wax can result in fire. Don’t go there—keep it cool.
 My collage was done on a canvas panel. For those who don’t hang out in the art section of their local craft store, these are sold in the canvas aisle, but they’re not the soft, stretched canvases you usually use for painting. These look more like flat boards with canvas stuck onto them, which is pretty much what they are. I like using panels because they’re stable and take a lot of abuse—plus, they’re relatively inexpensive.
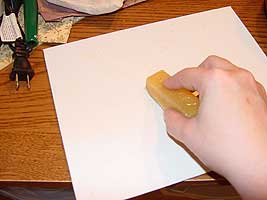
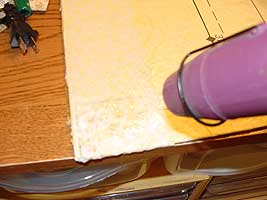
The first thing I want to do in just about any wax collage is lay down a base coat. For me, the fastest way to do that is simply to rub wax directly onto the panel, and then apply a little heat. My goal is to create a thin, even layer of wax on the panel, so it might take a couple of coats. I find this a much happier way of applying a base than slathering it on with a brush.
 If there’s too much wax on the panel, I simply drag the excess off with a piece of cardstock. Sitting off to the side is my Ranger Melting Pot, with a puddle of heated wax in it—covered, it heats at just under 200 degrees, and uncovered, it needs to be slightly warmer to compensate for the cooling surface. Excess wax goes into the pot, to be used later.
Once the panel is evenly coated, I give it a quick blast with the heat gun, and then apply my first layer into the melted wax. My background for this piece was an old sewing pattern. I really like using tissue papers for wax collage, because the layers seem to melt together so beautifully.
I heat the panel, and push the paper in gently, letting it absorb a little wax. There should be wax on all of the background when you’re finished—no unwaxed paper.
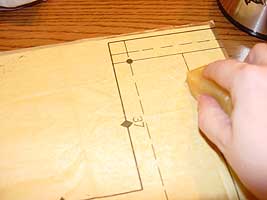 Now, I need a layer of wax on top of the background paper. I gently rub my wax block against the warm panel. If you’ve waxed your background properly, it will be sturdy enough to take the rubbing. Any places where you haven’t waxed will tear—this is why it’s important not to have unwaxed background paper on your piece.
Again, I’m rubbing the wax onto the surface of my piece, and then heating it occasionally, either with my heat gun, or when I’m closer to being ready to move on, with an iron.
I have two irons for wax collage. The first is a tiny Clover detail iron, purchased at Joanne. It’s great for smaller pieces, and just a spot of heat in the right place. The second iron is a tacking iron—it’s usually used by framers for heat mounting. I purchased this used on eBay. This is smaller than a home iron, but larger than the Clover—roughly the size of a travel iron, which is what some people like to use. It’s good for larger pieces, and overall heating and flattening. If you can find a travel iron with no steam holes in it, that will work just fine. Don’t get one with steam holes—they tend to show up on the surface of your piece at the most inconvenient times.
 The next thing I’m going to apply to my piece is some cotton lace. This is going to take some extra wax, both to hold it in place, and to coat the surface. I press my block of wax against the face of my little Clover iron, and drip some directly onto the surface, in the area where the lace will be applied. Drip a little, then press it flat, leaving an even, but slightly heavier coat than was applied in earlier steps. I prefer this to applying the wax with a brush, because it gives a much lighter coat.
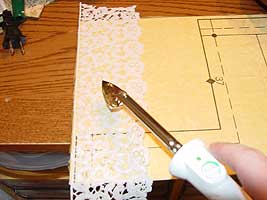 Here, I’m applying the lace to the piece. First, I simply press the lace into the wax with my iron. I’m doing this to make sure it’s all stuck down, using the wax underneath as glue.
 Next, I apply wax over the top of the lace. The lace absorbs quite a bit of wax, so the trick here is to let it soak in, without adding too much excess to collect in the holes. I do a little rubbing directly onto the lace, and then heat with my heat gun. Then I go back and do a little melting of the wax against my iron, and press. My goal is to preserve the texture of the lace, while coating it with wax. This takes a little practice, but it’s lots of fun to play with lace and fabric in wax, so dive in.
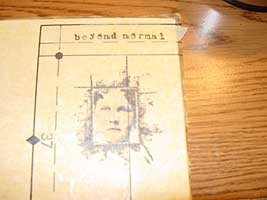 Over on the other side of my piece, I’m using some stamped elements. I cheat doing this, because I’m not the best rubber stamper in the world. I stamp the image and words on scrap pieces of pattern tissue, and then apply them with my iron onto the surface of my piece. Another light layer of rubbed and heated wax over them, and they look as though they were stamped directly onto the piece.
You’ll see in the finished piece that the stamped image has been colored. I did this, and the brownish aging around the edges, with crayon. The aging was done by melting the crayon against my iron, and then blending it into the wax surface. The coloring of the image was done by coloring onto the wax, without heating. Detail coloring should be done at the very end, without heat—any heating will cause blending as the beeswax melts into the crayon.
The techniques for applying dimensional items like buttons and measuring tapes onto the piece are from Collage Discovery Workshop.


