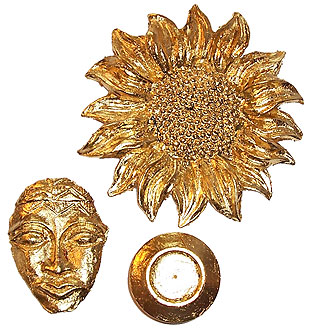
 These three items were finished with metal leaf. Notice I’m saying metal rather than gold—that’s because there’s no gold content in the leaf I used. Real gold leaf is ridiculously expensive, and generally not available in most craft stores. The stuff I used for this article is made of base metal, which makes it easier on the wallet. It also has slightly different properties than true gold leaf. Real gold is soft, and somewhat pliable, so it’s really easy to work it around dimensional objects without too much cracking. Metal leaf is kind of crumbly, and not flexible at all, so it cracks if you look at it. However, no matter what kind of leaf you’re using, the process is the same—so I did opt to save my real gold and silver leafs for another day, and do this lesson with base metal.
The really wonderful thing about leafing is that it will go over just about any firm, stable surface. That means something hard, like wood or plastic, rather than soft like latex or braid trim. For these samples, I chose a resin sunflower I yanked off an ugly planter box, a face mold cast in air-dry clay, and a plastic lid from a spice bottle.
 The first step is to base coat. Base coating is a personal preference sort of thing. Traditionally, many gold leafed pieces are based with a sort of earthy red tone, but any color works with metal leaf. Just remember that whatever color you use may show through in areas that crack—sometimes I use that as a design element. Here, I’ve base coated the face a bright red, the sunflower ochre and black, and I’ve left the black plastic lid as is.
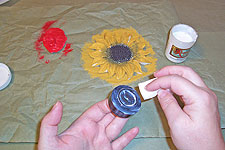 When the paint is completely dry, it’s time for an adhesive. Generally, gold leaf is applied with gold leaf size, a pressure-sensitive adhesive that gets tacky very quicky, and stays that way for quite a long while before setting up. I couldn’t find my Mona Lisa gold leaf adhesive, which is a terrific leaf size, so I settled for a bottle of Renaissance Foil adhesive, which is a fairly good substitute. I like this stuff because it’s waterbased, so the clean up is quick and easy. I followed the instructions on the bottle: apply, let set, then apply a second coat and let set. This step took about two hours—gold leaf prep is not speedy.
I guess I should mention here that the really speedy, though sometimes messy adhesive for leaf is spray adhesive. I don’t love spray adhesive because it’s hard to handle, bad for your lungs, and very often turns the whole work area into a big gluey mess, but if you’re in a big hurry, it will work.
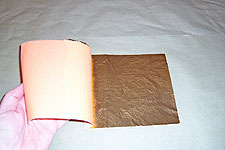 This is what most leaf looks like, whether it’s real or base. it comes packaged in tissue paper books of six inch squares, with the leaf just sort of floating on each page. The books should be handled very gently, and stored rubber banded between pieces of rigid board to keep the squares intact and flat.
Before opening a book of leaf, get yourself into a workspace that’s free of circulating air. That means closing up all the windows, shutting off any fans or air conditioners, and keeping clear of any running kids. This stuff blows around on any whisp of air, and once it escapes, it’s everywhere.
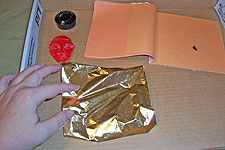
 Here’s my usual leafing setup. I work in a box lid, which contains all the bits and pieces of leaf. Everything goes into the lid—the book, the sized pieces, and the brushes. I use fairly stiff bristle brushes to work with leaf, and then do my final buffing with a soft cloth like an old t-shirt scrap.
To lift the first sheet of leaf, just touch your fingertip to it. Usually, there’s enough natural oil on your finger to make the leaf stick. If not, wipe your finger behind your ear and try again. (Actually, I don’t wear makeup, so I wipe down the side of my nose—never fails.)
 Float the leaf over a sized piece and let it settle onto the surface. It will stick immediately—don’t fight it. Gently pat the leaf down into the size. Don’t worry if it gets all wrinkly or cracks.
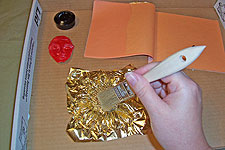 Use a bristle brush to push the leaf down into the size. Now, it’s really going to crack over any curves and contours. We’ll fix that shortly. Keep pushing with the brush over the whole piece, until the details of it become clear again.
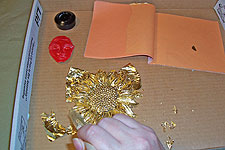 Now, we’re going to remove the excess leaf by gently brushing it away from the edges of the piece. Don’t be shy. Brush away all the extra, and leave it in the box.
 OK, let’s fill in some of those cracks. Pick up the pieces you’ve brushed off, and place them in the exposed size. They’ll stick where it’s sticky, and where it’s not, they can be brushed away. What usually happens is you start with really big pieces of extra, and gradually and up with lots of tiny ones as they’re brushed off the already leafed parts.
This is another personal preference thing. Some people want to cover every single bit of the surface with gold. Others like to leave big sections of base coat showing through. Just get the piece to the point that looks right to you.
Occasionally, a space without size will show up. You’ll have to go back and apply more to the bare spot, let it get tacky, and then go back to leafing. Trust me when I say you should leave the room and not mess with the piece if new size is applied to it—it’s a big gold leaf mess waiting to happen if you handle it before the new bits of size are ready.
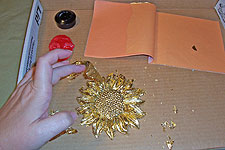
 This sunflower is leafed to my satisfaction, so now it’s time to give it one last brushing to knock any little extra bits off, followed by a buffing with a soft cloth. The cloth will usually end up filled with tiny bits of gold, so plan on tossing it after use, or you’ll be picking up little bits of leaf all over the house for the next year. Don’t ask me how I know this…
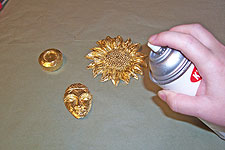 Now, some people like to tone or age gold leaf, either with watered down acrylics, or alcohol inks. I opted for no toning or ageing, and went straight to sealing. Once a piece is completely dry (check the size instructions for the true time on this, because it could be 24-48 hours), it does have to be sealed. Whether it’s metal or gold, it will react with the air and whatever’s floating in it, body oils, and anything else that comes in contact with it. Seal it!
I used spray sealer for this—just plain old Krylon clear gloss. There are sealers sold for leafing, so if you’re buying size, check if there’s a sealer to go with it. I do not reccomend using any kind of sealer that has to be brushed on unless you’re very experienced in working with leaf. It’s fragile, and easy to disturb at this point, so sprays are the easiest way to go.


