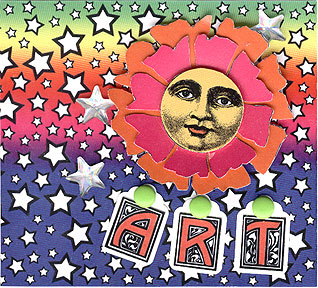
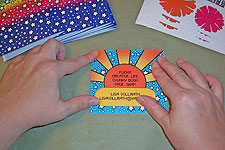
 Here’s one of the finished pages—there are ten in the set, which was one reason I wanted to do this digitally. I get bored very easily, and rarely take on projects that require me to do multiples of the same piece. If I can do some or all of the design work on my computer, and spend less time at my work table doing the same steps over and over again, I’m happier with the process.
I guess I should talk about my approach to digital collage pieces. My plan of attack is usually to design the piece on screen, then turn that finished design idea into the pieces and parts I’ll need to make it in real life. I’m designing my own elements to assemble—which, really, is what I do for a living most days. This is different than creating digital artwork, which I print as a flat, single piece. Hmm, maybe this will be clearer with a few visual aids…
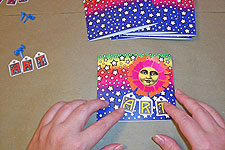
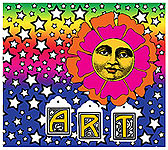 Here’s my digital mock up of the finished piece. I was staring at Peter Max artwork while I was designing this, for color and design elements. Stars, flowers with faces, and the bright color palette all come from his work, but the design is something I created myself.
In the back of my head as I work on this is how it might be assembled. I want to print my own backgrounds, and then float some elements on top of those backgrounds that will be cut and glued in place.
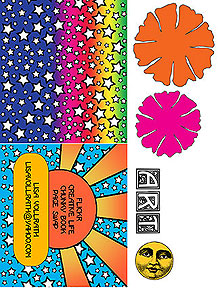 From the finished mock up, I create a print sheet. I work in PhotoShop, and build everything using layers. I can usually split out all the pieces and parts directly from the finished mock up, and turn them into the print sheet, which is what is shown at left.
Starting at the left edge, I have a background for both the front and back of the book page. I sometimes do a background that will be stamped or altered once it’s printed, but in this case, what you see is what I used, with no adjustments. Next, I have the pieces for the flower—the gold center face, magenta middle, and orange outer pieces. In my head, I thought I might be able to get some depth from this section of the piece by using some mounting tape, and bending the flower petals forward. Also shown are the letters for the tags. I’ll use purchased tags, and hand color the letters as I go.
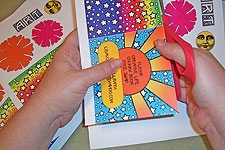 All right, the design is done—now it’s time for the drudgery. First, everything gets printed on appropriate stock. In this case, all the elements were printed on cardstock. Sometimes, I’ll split a print sheet up, and print elements on different papers.
All the pieces and parts have to be cut out. I do this in front of the television, and usually halfway through, I’m wondering why I signed up to do so many pieces.
 For this piece, I left the front and back backgrounds attached, and simply folded them back to back, with the fold line on the outer edge. No gluing yet, because I’m going to use the back to hide some uglies that will show up during assembly.
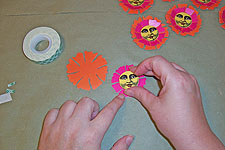 The flowers have three pieces. I started with the centers, attaching them to the pink flower petals with double stick mounting tape. This will give the finished flowers some depth, and also act as a spacer to keep the petals from being mashed down flat.
 The petals were all folded upward against the edge of the face.
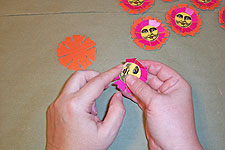
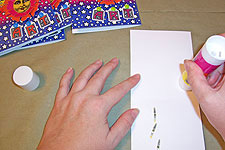
 I glued the center back of the pink petal section to the center of the orange, let them dry, and then did the same folding upward.
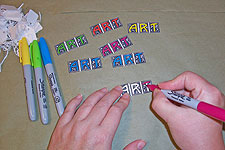 I colored the tag lettering using Sharpies in bright colors. I like to combine hand coloring with digital printing, but in a very vivid graphic piece like this one, it was hard to find a place to work too much of that in.
 The letters were glued to purchased tags. Each set is colored differently, and will have different brads attaching them—so, the pages are the same design, but not completely identical.
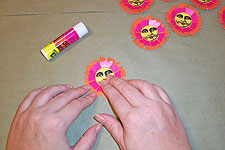
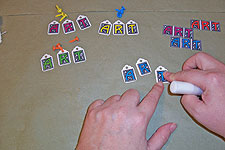
 Now I can arrange the pieces and glue them in place. The flower was glued down to stay, but the tags were just tacked in place with a little glue.
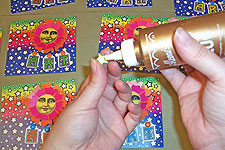
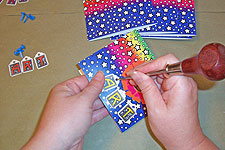 I used an awl to poke holes for the brads through the holes in the tags. The brads were flattened as much as possible on the back side, to keep the page from being lumpy.
 I opened the folded pages, and glued the heck out of them, pressing them flat with the back side down. This will make for a very flat back. When the pages were dry, I checked them for any white areas, and trimmed them square if necessary.
 Just to add a little more dimension and sparkle, I glued three star shaped rhinestones to each page.
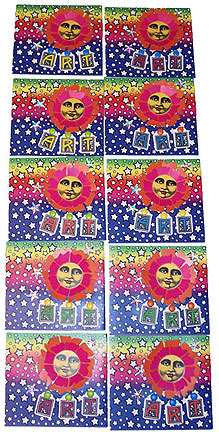 Here are the ten finshed pages, ready to be wrapped and mailed off to the swap hostess.


