

 Recently, a friend at Provo was kind enough to send me one of their Zision Punch ‘N’ Bind machines. I’d been eyeing all sorts of binding machines, so when I heard that Provo was offering one that would retail for a reasonable price, I had to try it out.
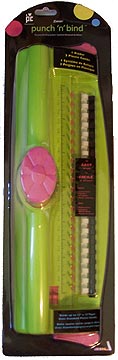
The Zision machine retails for around $35. in the US, which I think is a pretty good price for what arrived in my mailbox. This thing is big—it will bind 12×12 scrapbook pages. I was expecting a little weenie thing. The exterior, including the spines that spread the comb, is plastic, which kind of made me nervous, but only because I’m hell on tools. If I can break it or lose it, I probably will. Mercifully, I have so far not broken my lime green Zision machine.
The machine comes with three combs. I wanted a spine that was smaller than the ones provided. Would any comb fit? The answer is yes. I tested it out on plain old Office Depot combs in various sizes. Even the 1/4″ size I used on this book fit into the machine with a minimum of cussing—it was a little bit of a tight squeeze, but I did get the spines to open the comb so I could assemble my book.
OK, enough about the machine—you want to know how to make the book, right? To make this lovely grayscale book, you’ll need:
- A stack of the big Behr paint chips (available at Home Depot) – I used six, because I was sending this book out as a deco
- Some white cardstock to back the paint chips
- A Zision machine or comb binder
- A 1/4″ comb
- Images, ephemera and stamps to decorate the book
- A glue stick
- Scissors
To start off, I backed all the paint chips with white cardstock. I did this for two reasons. First, there’s printing on the back, and I wanted a solid page. Second, six paint chips weren’t quite thick enough to fill a 1/4″ spine. Six paint chips backed with cardstock were a perfect fit.
Next, I punched my paint chips, one at a time, since I was punching through two pretty heavy layers of stock. Here’s how to punch, from the back of the Zision package (if you’re using a comb binder, the process is pretty much the same):
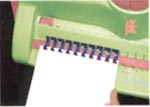
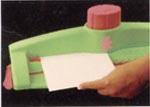 Insert the sheet of paper or cardstock into the paper slot.
 Push button down firmly to punch.
With all six chips punched, I went ahead and decorated the front cover before binding. I’m really into cutting around the outside if figures right now, and floating them on a background. That’s sort of what I did with the woman’s photo. I also like hanging images off the edge and trimming them off. The rest of the embellishments are a stamped ruler, a piece of filmstrip, and a flattened bottle cap. Random elements, but all in grayscale.
Now, it’s time to bind:
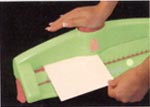
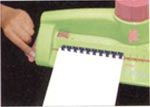
 Make sure that the teeth of the comb are curled inside the spine of the comb before placing it onto the binder. Insert the plastic comb between spines and push to the right, which will push the spines into the curls of the comb.
 Push the pink levers up to open comb, then insert pages.
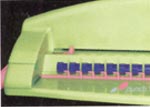
 Lower pink lever and remove finished book.
I liked doing the comb binding for this project because it made everything go together so quickly. I usually spend a great deal of time binding decos, so it was fun to just decorate and go.


