 This week, I received Angela’s altered book about circles. A lot of the work already done in the book dealt with quotations and expressions using the word circle. I sort of wanted to do something a little less literal. I had a picture of the universe swirling in a circle, with all sorts of pieces and parts spinning around. One of the things I wanted to incorporate was some sort of shallow niche that contained stars—partly because I like doing shaker box elements, and partly because this book is SO thick that it will never be finished if everyone just does two flat pages worth of work.
So, back to the point of this lesson: the shaker box. This is usually done on cards. It’s just a chunky, cut out section that’s covered with a clear window, containing some little goodies that will move around when you shake the card. To do this in an altered book, I had to glue a bunch of pages together into a page block to create the depth necessary for filling. Clear as mud?
 First, I had to cut holes in quite a few pages. While most niches start by gluing the pages first, then cutting, I usually work circles the opposite way—cut first, glue later. Since these niches will be relatively shallow, I felt confident I could make everything line up properly. For a small hole, I used a hole punch, going through a few pages at a time, and watching the bottom to line up each punch with the previous ones.
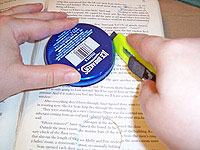 For a larger hole, I used a guide. I had a round metal candy tin handy that worked for this. I just pressed the tin against the pages, and cut around it slowly with a craft knife. Every so often, I’d lift the tin, remove the holes I’d cut, and flip the finished pages out of the way, then line the tin back up, and cut more. Little by little, I cut through the 1/4″ of pages I used up for this layout.
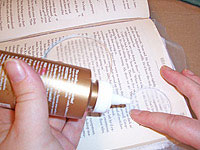 Now, a little gluing. I tucked a piece of waxed paper underneath the bottom punched page, applied some glue to the tip of my finger, and smooshed it into all the cut areas, covering them completely with glue. I also applied glue this same way to the outside page edges to create a solid block.
I left one page with holes punched in it unglued at the top of the block. I’ll use this to create the cover for the shaker later.
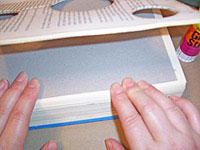
 I slid the waxed paper out from under the block and replaced it with plastic wrap. I also covered the top of the block with wrap. This will allow me to close the book and weight it without worrying about my niche block sticking to any uncut pages.
 Weight, and let dry overnight. It’s good not to peek at books that are drying—just leave them closed and let them be.
 The next day, I could start working on building the shaker, which is going to go into the really large hole I cut using the tin. First, I wanted to give it a solid backing. The easy way to do this is to simply glue a piece of chipboard to the page beneath the block. This will take all the flex out of the bottom of the page block, so the shakable stars can move over a nice, flat surface.
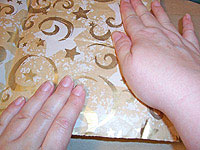 While the chipboard was drying, I covered the top of the shaker with the background for my whole layout. This lovely patterned paper is going over that one page with the holes punched in it. I cut the holes and trimmed around the edges to make a nice, neat cover for the shaker. This page will lay over the top of all my uglies later.
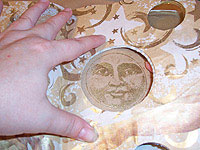 With the chipboard dry, I could lay in the bottom of the shaker box. I stamped and embossed a moon face on brown paper, and applied it behind the page block, over the chipboard using glue stick.
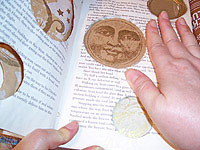 Using more Tacky glue, I glued the whole page block down to the backing page, paying particular attention to the area where the hole for the shaker was cut. I really want to get this area completely glued to the backing, with no gaps—otherwise, my little shakable stars will leak out later.
OK, this has to dry completely before moving on, because I don’t want the stars to stick into the glue. I set it aside overnight again.
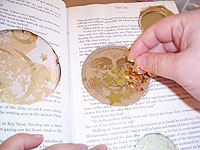 The next day, I added a few pinches of gold sequin stars to the niche.
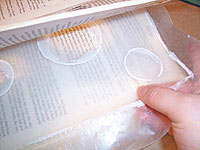
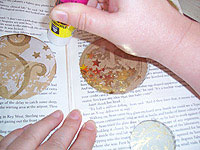
 Over the top of the hole goes a piece of clear acetate. I used a leftover bit of transparency. I often save bits of clear packaging to use for this. Anything that’s clear and sort of sturdy will work.
Like I did at the bottom of the shaker, I’m paying particular attention that there’s a good, solid seal around the circle. I don’t want stars leaking out.
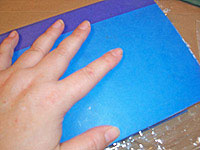
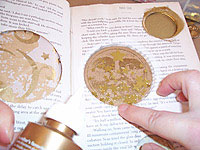
 Now, to cover all the mess, I’m just going to apply a little glue stick to the cover page, and smooth it over the whole block. Like magic, it hides all the uglies.
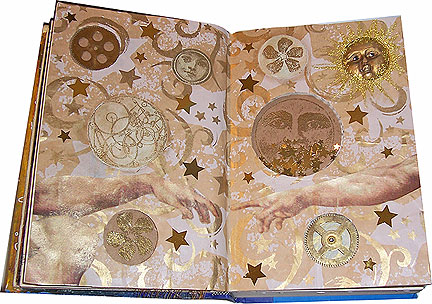
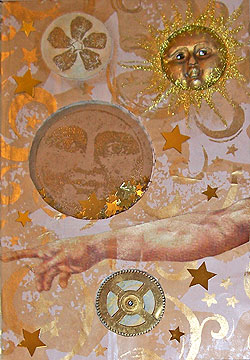 Here’s a closer view of the shaker, in the big round opening. The stars move around as the page turns, and settle into the lower section of the niche when the viewer holds the book up to look at it.


