
 When I was focused on textiles, I used to take endless delight in mixing my own dyes from natural ingredients. There’s something really magical about taking bits and pieces from nature, brewing them in a big pot, and watching as a thick, dark liquid forms.
I’ve often heard that you can make inks for mixed-media work from all sorts of natural items, including many types of nuts. I have pecans coming out my ears here in Texas, but my heart’s desire was a really dark, sludgy walnut ink. I can never quite get those freeze dried crystals to make an ink that’s dark enough, and commercially packaged walnut ink falls a little short, as well. Surely I could boil down some walnut hulls and make the ink I had in mind happen.
Easier said than done. This technique is smelly, messy, and time consuming. A whole pot full of walnuts boiled down to three small jars of ink. However, that ink is incredibly dark and full of sediment, which is exactly what I wanted, so the time and energy were worth it for me.
Black walnut hulls stain everything they touch.
Be sure to cover your work area with plastic.
Wear gloves to avoid staining your hands.
Watch the pot while it’s cooking to avoid any boil over.
Materials
Now that you’ve been warned about the drawbacks of doing this yourself, if you absolutely must make your own ink, you’ll need:
- Black walnuts in shells, with the hulls still attached. The hulls are usually green when the nuts fall from the tree, and turn almost black as they get older. Trust me: gather fresh ones. Mine were from last fall, gathered for me by an artist friend with walnut trees in August. That means they’d been laying around for almost a year, and they had nasty things in them like mold, mildew, and icky bugs.
- A big pot dedicated to craft work. Please don’t use your cooking pots for this. Once you’ve boiled up walnut ink in them, they won’t be good for anything you’ll ever want to put in your mouth. The walnut ink stains like nobody’s business, leaving the pot permanently marked with a big, brown ring. I bought a cheap soup kettle at the dollar store.
- Utensils dedicated to craft work. I used a paint stick from the hardware store to stir, and tossed it when I was finished. At the dollar store, I bought a cheap ladle and slotted spoon set. That’s the minimum you’ll need. A strainer might also help.
- Glass jars for your finished ink. Do not store ink in plastic or metal containers. It’s acidic enough to eat through them. I used old glass peanut butter jars with metal lids.
- Old nylon stockings for straining. I just purchased a pack of knee-highs when I was at the dollar store, since I don’t wear stockings.
- White vinegar and salt.
- Paper towels, newsprint, plastic drop cloths, and whatever else it takes to protect your surfaces. I can’t say this often enough: walnut ink stains!
- A hot plate or a range to cook on.
- Rubber gloves if you don’t like getting your fingers dirty. Again: walnut ink stains like crazy. You have been warned!
Instructions
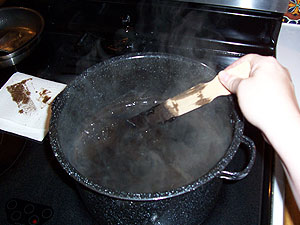
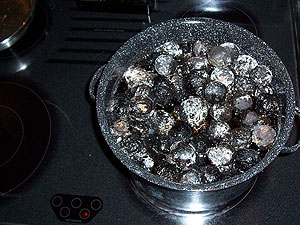 Fill your pot with walnuts and cover with water.. I used a 10-12 quart pot, and filled it fairly full with nuts before adding water. The nuts may float. That’s normal.
 Put the nuts on to boil. When they look like they’re ready to boil, reduce the heat. Trust me, you don’t want this pot to boil over. Simmer for two hours.
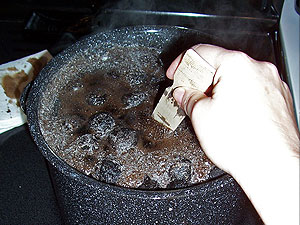
Let the pot sit overnight, so the hulls can soak, then heat it again and let it simmer for a couple of hours. Your hulls should have fallen off completely by this time, leaving nuts in shells behind. Let the pot cool.
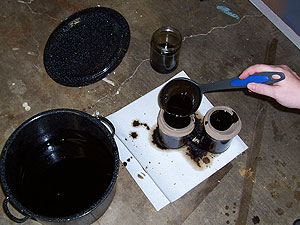
 Remove the nuts from the pot using a slotted spoon, and discard them. They’ll stain anything they touch at this point, so my solution was to dump them in the backyard rather than try to wrap them in enough plastic and paper to keep them from leaking. If you compost, you can throw them on your compost pile.
 Return the nut-free pot to the range, and boil the heck out of it. The amount you reduce the liquid will directly effect the density of your ink. I wanted black sludge, so I boiled mine down quite a bit, and tested it as I went by patting my stir stick onto a paper towel so I could see how dark the ink was. To slow down mold and mildew, I also stirred in about a cup of vinegar, and half a cup of salt.
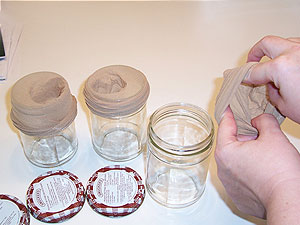 Let the ink cool to room temperature. Prepare your glass jars for straining by covering the tops with nylon stockings. Let the stocking hang into the jar a bit.
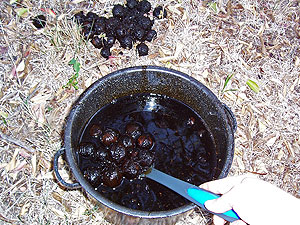
 Ladle ink into the jars, pouring it through the nylon stocking to strain out debris. I pulled my stockings out, and squeezed them slightly to get all the liquid out. This caused a very thick sediment to trickle out. This settles to the bottom of the jars, and makes the ink darker on the bottom of the jar than on the top. Store ink in the refrigerator, and skim away any mold if it grows.
To avoid staining my kitchen counters, I did this step outside, in the garage.
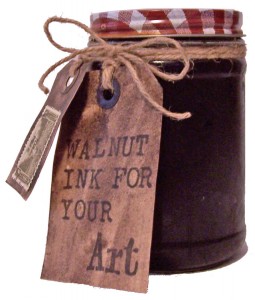
I ended up with three lovely, sludgey jars of walnut ink. I decorated two of them with tags and jute cord, and gave them away to artist friends. The third has been in my fridge since autumn of 2005, and is still good. I’ve had no problems with mold or smell, thanks to the vinegar and salt I added. The ink is still lovely and dense, but it does have a bit more sediment in it now.
This article was originally published in the November 2005 issue of The Monthly Muse.


