 I’ve been buying little wood cabinets at Michaels for as long as I can remember. Sadly, they’ve decided to discontinue the styles I prefer, with solid doors, in favor of styles with openwork doors. Fortunately, they’ve put the old styles on sale for a quarter apiece, and the members of my local mixed-media group have stocked up on them. We’re doing a wood cabinet shrine swap this month, and some of the girls expressed a little angst about it. I told them I’d write up a lesson on how I make mine, regardless of the fact that this lesson will become obsolete in a few weeks when all of you have snapped up the remaining stock at your local stores.
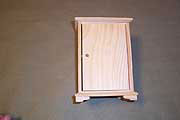 This is the basic wood cabinet, made from cheap pine, and not terribly well constructed. For my purposes, the poor construction is a plus, since I’m going to tear the poor thing to bits. I do check for doors that open and close easily before I buy.
 When I was involved in miniature making, what I do in the next few steps was fondly referred to as kit-bashing. This is something most dollhouse enthusiasts love to do: take what the manufacturer gives you, tear it apart, and turn it into something else. Those of you with faint hearts and few hand tools should avert your eyes, and use the cabinets as they are…
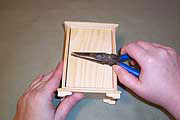
The basic cabinets come with little wood doorknobs. I can almost always find something more interesting to use as a knob, so I yank the little things out with pliers.
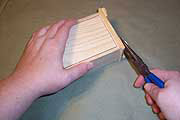
 Inside, there’s a single shelf, smack in the middle of the box. I prefer a box with no shelf, so this comes out as well. It tends to break if I snap it out with needlenose pliers, but I’m generally too lazy to walk out to the garage and get the snub nosed ones that will break it out in one piece. Since I’m going to toss most of this shelf anyway, laziness wins.
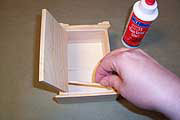 Once the shelf is gone, the door swings into the cabinet rather than closing flush with the front. To fix this, I cut a small sliver from the broken shelf, and use it as a doorstop inside the cabinet. The stop is glued in place with a little Weldbond or wood glue, and allowed to dry. Here’s a tip: make sure that once you position the stop, you close the doors and check that it’s in the right place. The first time I did this, I glued it too close to the front edge, and ended up with doors that were permanently open. Not pretty.
 Some of the cabinets come with these strange little shaped feet. I don’t love them, so while I’m tearing things out, I pull these off.
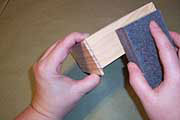 A wise man once told me that anything built with wood should be sanded at least once. These cabinets have lots of rough spots, so a little work with a sanding block is usually in order. Try to sand with the grain if you can find it.
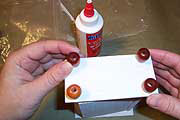 I like adding new feet to most cabinets. In this case, I’m adding four identical wood beads, glued in place with a little Weldbond. These have to dry completely before going any further. I usually let the glue get tacky, then flip it over and let it dry on its new feet to keep it from wobbling later.
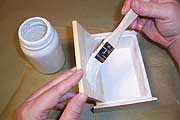 When the glue is completely dry, the whole cabinet gets a light coat of gesso or primer. No gesso? Use plain white acrylic. This coat is mostly to seal the wood, and keep it from sucking up the paint and adhesive later.
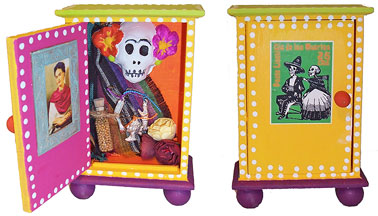
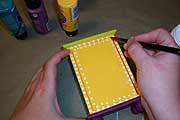
 When the primer is dry, it’s time for paint, collage, or whatever your heart desires. This cabinet was destined to be a little Day of the Dead box, so I painted it with bright colors: yellow, teal, purple and lime on the outside, and pink and orange inside.
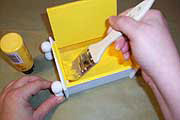
 All those colors needed something to tie it together, so I added dots of gesso around all the straight edges of the box. To do this, just dip the wrong end of a paintbrush into the gesso, and apply one dot at a time.
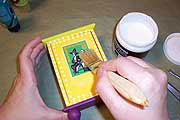 I use matte medium to apply any paper bits. In this case, it’s a faux postage stamp from Ten Two Studios. I like working with paint, paper and rubber stamps on the same box to create designs, so most of my cabinets end up with quite a few layers on them.
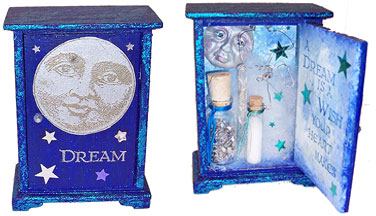
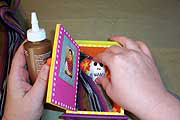 When the exterior is complete, I move to the interior. I like to fill my cabinets with lots of weird stuff. I usually start with rolls of paper and fabric tied with floss or string. I often use little glass bottles filled with glitter or spices. Almost all of the cabinets I do contain a face somewhere. This is the personal part of shrine making—accumulating the items and arranging them in a way that means something to the maker.
Two more finished cabinets:

Larger, clearer photos of these and several more cabinets I’ve made over the years are posted in the gallery on my personal site, LisaVollrath.com.


