


I recently joined a paper bead swap on Nervousness. I’ve always wanted to try making paper beads, but never seemed to get around to it. Typically, if I want to teach myself to do something, I have to join a swap to force myself to make time for it.
There are lots of good tutorials for making paper beads already posted online. I read through a couple of them, and then set off to make paper beads my own way.
What you’ll need to make your own paper beads:
- Paper – I used couple of different papers for my beads. The red sets were made from scraps of decorative paper, about the weight of scrapbook paper. The blue set was made from a full page ad torn from a magazine. Both types of paper worked well, and gave me minimal hassles. Other papers you might try: origami paper, gift wrap (you could make quite a few beads from whatever’s left over from your next wrapping job). I’ve read that tissue paper can be used, but that sounds a little fragile for my sticky, gluey fingers.
- A paper cutter – I use a paper trimmer because I can’t cut a straight line to save my life. If scissors are what you have available, those will work just fine.
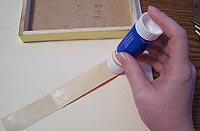
- Glue – I used plain old cheap gluestick from Office Depot, which is my glue of choice for most paper crafts. Whatever paper glue you have in your work room will do just fine.
- Coffee stirrers – Grab a handful of plastic coffee stirrers the next time you’re getting coffee to go. Make sure they’re plastic, and that they’re the ones that look like tiny straws, with the hole in the middle. My friend Robin looked at me like I had two heads when I tucked a fistful into my purse last time we were at Cafe Brazil, but I’ll be she’s going to love getting a little baggie of these beads next time I see her.
- A drying stand – Find a container that’s slightly narrower than your coffee stirrers—it could be a small cigar box or a box from notecards, or a plastic container. Anything that will allow you to set your beads down and let them dry without touching any surface.
- UTEE – Fork out for Ultra Thick Embossing Enamel. I know it’s expensive, but that 10 dollar jar will last you a long time. I’ve been working on the same jar for over a year now, and I’m only just now halfway through.
- Embossing ink – I used the clear stuff. If you need to replenish your pad, the recipe is one part water to one part glycerine, which can be purchased at most drug stores. Pour a tiny bit at a time onto your embossing inkpad.
- Bamboo skewers – Find these at your local grocery store or Asian market.
- A heat gun
- Metallic thread or embroidery floss, paints, gold leaf flakes, or whatever else you want to use to glitz up your beads.
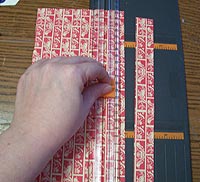 Cut your paper into strips with a paper cutter. Most of my decorative paper beads were 1 inch wide, and 8 inches long. The strips I cut from magazine ads were a bit longer—maybe 11 or 12 inches—because the paper was thinner, and I wanted the beads to be the same size. You can cut your paper any size you wish. Wider paper will make a taller bead. Longer strips will make them thicker. Experiment and see what you like.
 To start a bead, flip a strip of paper over and apply glue. Don’t be shy with the glue. I left about a half inch at the end of my strip glueless—this is the end I’ll start with, so that my bead won’t be tempted to stick to the coffee stirrer.
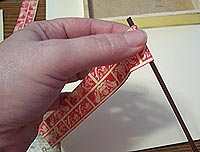 To roll a bead, just coil the paper around a coffee stirrer. The stirrer will create the hole in the center of your bead—it will be large enough for hemp or lightweight cord to go though, and even small rattail. Torn fabric looks pretty nifty, too. Keep rolling your paper until you get about an inch from the end.
 To keep my pesky paper ends stuck, I found it helped to apply some extra glue to that last inch of paper, and a bit on the bead as well. Roll up the last inch, and keep moving your fingers around the bead in a rolling motion for a few seconds—your fingers should be just gluey enough by now to persuade your paper end to stick without mucking up the bead.
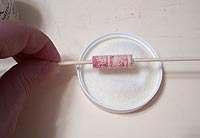
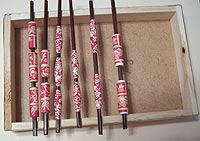 I rolled my beads two or three to a stirrer, and set them to dry by hanging the ends of my stirrers on the edges of a box. It took a couple of hours for this first group to dry, so roll your beads, go watch a DVD, and they should be ready to go when the movie is over.
When the beads are dry, slide them off the coffee stirrers. Be firm with them—sometimes, they want to stick. I found putting my thumbnail against the stirrer and sliding upward worked well to persuade them off without disturbing the shape of the bead.
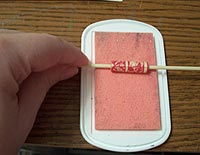 This next part has to be done one bead at a time. First, place the bead on a bamboo skewer. Then roll it across your embossing inkpad a couple of times. You want it damp, but not soaked with embossing ink.
 Quickly roll your bead in UTEE. I set mine up so there was a big pile of it in the lid of the jar, and just plunged the bead in. When the bead is covered with powder, blast it with a heat gun, keeping the bead rolling on the skewer. You’ll want to keep this rolling motion gowing so that the UTEE doesn’t melt and run all to one side of the bead.
While the UTEE is still hot, plunge it back into the dry powder again, and then reheat. You’ll want to do at least two coats. I ended up with three coats on my smaller beads, and four on the larger ones. With each coat, remember to keep the bead rolling so you get even covereage. This becomes more difficult with each coat, because there’s more UTEE sliding around. If you’re into lumpy, bumpy beads, you’ll see right away that you can stop rolling for a second, and let the UTEE puddle a bit.
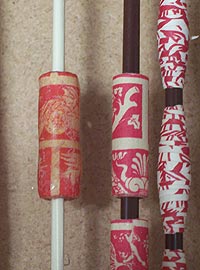 Here we go: on the left, a finished paper bead. On the right, rolled beads that are waiting for their coats of UTEE.
See those beads that seem to taper at the ends? I did those by cutting my strips, and then cutting them again like this:

You end up getting two beads from each strip, so it’s a great way to make your paper go farther. You can vary the shape of the bead by cutting away some of the center, and leaving two pointy ends. I also did a couple of beads by rolling a white paper core, and then doing about three inches of decorative paper around the outside—another way to make your paper go farther.
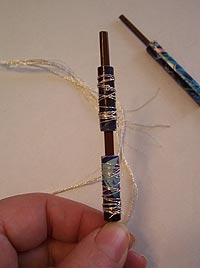 My first set of beads was pretty plain—just paper and UTEE. There are endless things you can do to glitz up your beads before and during the UTEE application. For my second set of beads, I wrapped the paper with metallic embroidery floss. When the UTEE was applied, the lumps and bumps the floss created smoothed right out.
Beads can also be painted with acrylics, dry brushed with Lumiere, rubbed with glitter glue, rolled in gold leaf flakes—pretty much anything you have laying around can be thrown on before the bead is dipped in UTEE. Just be sure your paints and such are dry before you start rolling in the powder. Once you’ve started adding UTEE, you can also dip the bead in colored embossing powders. I have a real thing for tiny star-shaped confetti, so I think the next batch of beads will have a couple of those sprinkled on before the last coat of UTEE.
Have fun with your beads!


