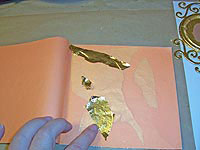
 This week, I worked on new altered book about Marie Antoinette. I made the book by taking apart two volumes of a Portugese version of Les Miserable, then turning them into a journal filled with my own papers, sort of in the style of this book I wrote about in 2006. This is the book that prompted me to make all those coffee stained papers.
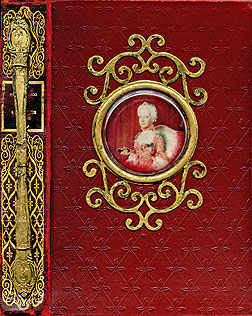
I started with books that were already pretty nifty in terms of their look. The covers are a lovely maroon, embossed with little flowers and ribbons on the diagonal. The spine is gilded to death. All I really wanted to do was find something pretty and gold to use as a binding stick, and a flat-ish gold frame for a portrait. Sounds pretty simple—but after much searching, I resigned myself to having to create items that matched the picture in my head. Fortunately, I have a pile of metal leaf, and know how to use it.
Metal leaf is the poor sister of gold leaf. It’s made of base metal—so, it’s sort of like junk jewelry rather than real gold. It has some of the same properties as real gold leaf without the ridiculous cost. The minus is that it’s incredibly brassy and bright, and more brittle than real gold, which makes it want to crunch into little shattered pieces rather than lay down in a beautiful, continuous sheet. It’s sold in some craft stores, in small square books, and is also available online from Dick Blick as Imitation Gold Leaf.
 I started with three things I needed to complete my book cover: the binding stick, made from two spoon handles glued together and wrapped in the center with metal tape, a chipboard frame from K & Company, which was the right size and design, but totally the wrong color, and a large metal juice lid, which fit nicely in the round opening of the chipboard frame. You can leaf just about anything that’s not soft and squishy.
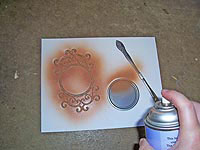
Because metal leaf cracks, the base color of objects often peeks through. To make sure they all come out the same color when they’re finished, it helps to start them off the same color. I gave mine a blast of tan spray paint. Real gold leaf is often applied over base coats of red or terra cotta, which gives it a warm glow, but any base color is fine. Even blue, if that floats your boat.
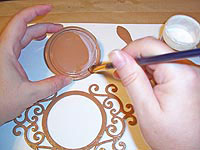 When the paint dried, I gave the pieces two good coats of gold leaf size. This is a glue that has a very long open time. Dick Blick sells gold leaf size as a spray, which is sort of like spray mount photo adhesive. It’s faster, but I’m notoriously bad about spraying glue all over the place, so this paint on stuff is better for me. The size I have now is designed for Renaissance Foil, and washes up with water.
Most size instructions will tell you to do two coats. Do them. There’s nothing more frustrating than starting to leaf, and discovering that your single coat didn’t get stickiness all over your surface. You end up with holes, lots of basecoat showing through—bleh. Don’t ask me how I know this…
 Don’t forget to apply size to edges of dimensional objects. Let dry between coats according to the package directions, and be sure to check the open time—the maximum amount of time before the glue sets up and is no longer sticky.
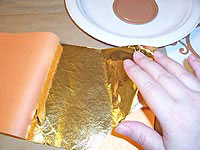 You don’t really pick up sheets of leaf when you’re working with it so much as float them from place to place. They’re so thin that any little breeze will lift them—so, now’s a good time to shut off the AC, turn off the fans, and park yourself in a place free of dogs and children running by.
To lift a sheet, just touch it. You usually have enough oil on your fingertips to lift the sheet. If not, I know this is kind of gross, but rub your fingertip along the side of your nose, and try again. Don’t lick your finger and try to do this.
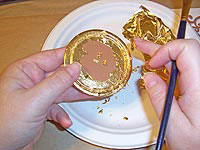
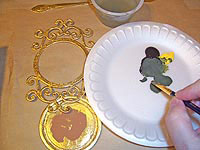
 Float your sheet right over to the sized objects, and let it settle on them. I always work in a cardboard tray of some sort, or in this case, a paper plate. This catches the crumbs of leaf, which are worse than seqins or glitter for getting everywhere. Be sure to work on a paper or cardboard surface rather than plastic or styro, which will create static that gets in your way.
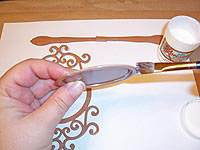
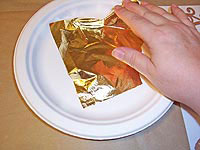
 OK, you’ve touched your leaf for the last time. Keep your oily fingers off it until it’s been sealed, or you’ll get fingerprints all over it. Work first with a soft brush, pushing the leaf down onto the surface that’s been sized. If your surface is flat, it should go quickly. If it has curves and bends, it will require a little poking, and you’ll get a Rice Crispies crunch sound going. Unlike real gold, which is soft, and will stretch and bend to accomodate curves, metal leaf is brittle, and simply cracks. Go with the cracks—we’ll fix any huge ones in a minute.
 Once you’ve pressed the leaf into place, use the brush to softly remove the excess around the edges. Just brush at it until it breaks away. Don’t pull it.
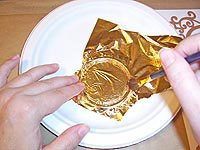
 If you have big cracks, just lift some of the crumbs in your plate, and float them into place. Press the leaf into place with the brush, and brush away any excess.
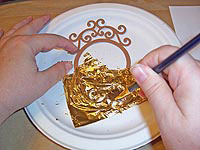 This filigree piece took quite a while to leaf, because it was so curvy. I started by floating the excess of the first sheet over it, then just kept lifting crumbs from the tray, and pressing them into blank spots.
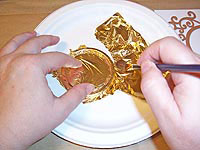
 If there are big chunks of leaf left in the tray, float them back into the book. You can use them on your next project. If you have small crumbs left, and don’t want to use them for anything, slip your whole tray into a grocery bag, and tie it closed, then dispose of it. Do not dump these into the trash directly—the first item that’s tossed in on top of them will scatter the little bits, and they’ll float everywhere. You’ll be picking them out of your hair for months.
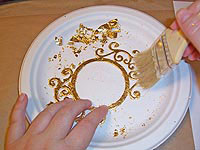 When the piece is completely covered with leaf, let it set until the open time of the size is over. My bottle said an hour, so I left it alone for two to be sure. I brushed the whole piece with a bristle brush, going in every direction, and not being particularly gentle. This removes any remaining crumbs of leaf, and starts to burnish the surface. Sometimes, if a piece is very large, I’ll also do this step with a cloth.
 If you love your shiny gold pieces as they are, just give them a blast of spray sealer, and you’re done. If you need toning, which most pieces do, you can use acrylics thinned with water to create washes that can be added, then dabbed away. I usually use black and yellow to create different tones of muddy green for this.
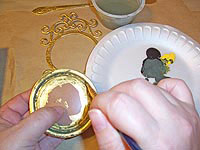 My pieces needed some shading, as though they hadn’t been polished lately. I added washes of muddy green, letting them settle into low spots and dry just a little before wiping them with a paper towel. This keeps the high points gold, while giving the lows some serious grunge. When the washes are finished and dry, a quick blast of spray sealer will protect the leaf.


