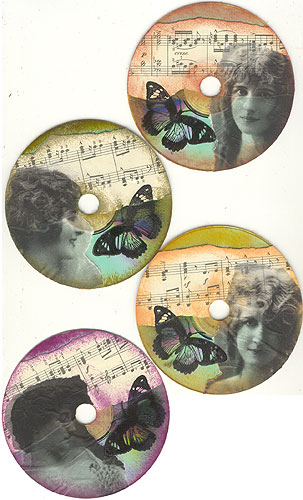
 Is there anyone who doesn’t have a pile of junk CDs? With all the promos that are sent out for the various Internet companies, it’s hard not to have at least a few of them laying around. Don’t throw them away—alter them! I use this fast process to whip up CDs in groups. The four at right were done in a group of seven, part for a swap on Alterations, and part to add to my own collection. As you can see, different images and ink colors are used for each CD, but the process remains the same.
You’ll need:
Old CDs
Scraps of text paper – I used Japanese text and old sheet music
Vintage images
Rubber stamps
Black pigment ink
Black embossing powder
Colorbox Cat’s Eye Chalks in various colors
Glue stick
Heat tool
Scissors
Craft knife
Tear strips of text paper about 2 inches wide. Glue one to each CD with a glue stick: I apply the glue to the paper, position on the CD, and then trim around the outer edges with junky scissors.
Tear around edges of vintage images. For my images, I used scans that I printed onto tracing paper using a laser printer. I don’t reccomend this technique unless you have a full vocabulary of curse words at your disposal. Printing the images on plain paper, or on a transparency will work just fine, and will require infinitely less cursing. I printed in black and white, but if color prints are what you have, use them.
Stamp images on CD with pigment ink, and then emboss with black embossing powder. Heat just long enough to melt the powder, and then leave the CD alone for a few minutes to cool. This is very important—don’t handle the CD while it’s hot, because it becomes flexible, and is prone to ripple.
When the CD is cool, trim the outer and inner edges of the CD to create two neat circles. (For those of you who prefer ragged edges, skip this—I like the two neat circles in contrast to the torn edges, so I trim.)
Choose a color of chalk ink, and apply it directly to the CD, patting lightly. I usually go around the outside edge, along the edges of the paper, and around the inner hole. I usually apply it heavily to at least one section of the bare CD, to create a shimmery colored area. Experiment, and you’ll come up with your own ideal application.
Blast the CD once more with a heat tool, concentrating on the areas where the colored ink is on the bare CD. Anywhere it touches paper, it will not need to be heat set, but on the bare CD, it needs a little heat to help hold. Let the hot CD cool completely before handling.
That’s it—finished CDs! I usually work on the reverse side of old CDs, which means all the printing is on the back side. If you’re going to mount these in a collage or altered book, there’s no need to finish the back side. Same thing if you’re going to apply them to a card or the front of a journal. However, if they’re going to stand on their own, you can give them a quick blast of spray paint, webbing spray, or even a coat of pigment ink to bring down the old printing a bit.


