
 What Is a Tip-In?
A tip-in is a page or set of pages created outside a book, to be attached into it later. This isn’t something that was invented by altered book artists—all you have to do is pick up any magazine to find examples of tip-ins. Usually, they’re ads or extra features that are attached into the magazine after it has been bound, and they’re often designed so they can be removed easily by the reader.
In the altered book world, tip-ins have become the cost effective way to do a collaborative book without incurring the cost of mailing entire books between artists. Tip-in swaps are common: you make five tip-ins to the swap specifications, mail them out, and receive five tip-ins from different artists in return. These can be attached into a book of your choosing.
Making a Single Page Tip-In
The page shown at right is an example of a single page tip-in. It is designed to cover a single page of a book. It is one-sided, although some tip-in swaps will request single pages be double sided—that is, that both sides of the page be decorated somehow, or that one side be decorated, and one side contain an explanation of how the page is created. Here’s how to create a single, one-sided page:
 First, you’ll need a base on which to build your page. Often, the size of the base will be defined by the swap organizer or host. I build my tip-ins on cardstock or heavy index stock, so they’ll stand up to handling, and support all but the heaviest embellishments. When designing a tip-in page, this is important—you want to build something that will hold together through being stuffed into a mailing envelope, tossed into a mail bin, thrown around by a mailman, and ultimately attached into a book somehow. Don’t build flimsy, fragile pages—but don’t build them so thick and heavy that they’ll break the spine of a book when they’re attached into it, either.
 Once you have a base, you can design your page on top of it. Often, tip-in swaps will have a theme or set of requirements for pages. Be sure you meet those requirements. Often, a host will indicate things such as a clearance on the left side of the page for attachment, or not to use certain types of embellishments. It’s important to remember that you are designing a page that will be inserted into a book at some point, so the usual concerns about bulky embellishments at the spine come into play. Also, it’s important to stick as closely as possible to the size requirements.
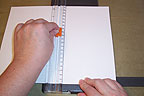
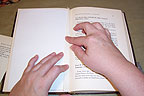
 Here, I’m doing one last check to make sure I’ve left a half inch clearance on the left side of my page. This is a common requirement for single pages—to leave some room for attaching the tip-in into the book at the left side. Often, the page will be attached to some sort of stub, which might cover a portion of the left side of the page, so it’s best to keep any important design elements out of the way.
 This is very important: don’t forget to sign and date your work so it’s readable. Nothing is more annoying than receiving work, and not knowing who it’s from. Sometimes, hosts will ask that you label your work on the back side of the page, and add a little message there, or some type of supporting text or artist statement. Be sure your page conforms to the rules of the swap.
 About Double Sets of Pages
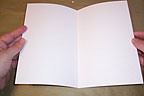
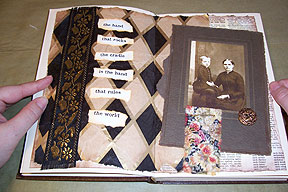
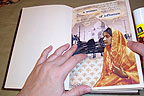
My favorite type of tip-ins are double pages. These are designed to cover two book pages, with a fold at the spine. They very much mimic the type of work done directly into a book. Designing a double set requires the same planning as designing an altered book layout, with some additional thoughts toward allowing the page to be mailed and attached.
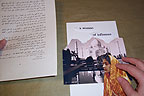
The layout at right was done for a tip-in swap. Notice how the four corners are clear of embellishments or important design elements, and how the center of the layout has a little clearance on either side, with no bulk in it? These were choices I made to help the folks who receive my pages attach them into their books with relative ease. Here’s how I made these pages:
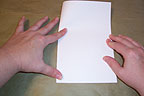
 First, I started with a base of index stock, cut to the size specified in the swap instructions. I folded this piece in half, to give me some guidelines for the spine of the book. Some people make their tip-in sets flat—I think this is a mistake. Folding a finished work after it’s completed isn’t always as easy as it sounds. I always want to simulate how the pages will look and function when they’re in their final home—attached into a book.
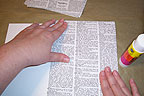
 I layered some background papers over the base, letting them hang over the edges, and then tearing them to size, and aging them with some chalk inks. Tearing edges to size, letting them hang over the base just a tiny bit gives the pages a softer look than cutting them in straight lines like I did with my single page above. Just be sure you don’t exceed the size specified in the swap requirements when you do this.
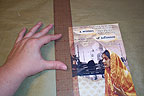
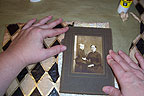 I embellished over my background papers. This included gluing a large photo in photo folder onto the page. I let this hang over the edge of my base just a bit—maybe 1/4″ on the pages I mailed out. Try not to break out of your four sides so much that your page becomes larger. Little bits sticking out here and there aren’t bad. I also kept my bulky embellishments toward the outer edges, away from the spine, and left a half inch clearance down the center of my pages, where they might actually be tucked deeply into the spine of the book later. All this helps make a pleasing addition into a finished book, rather than something that will cause much cussing as it’s being added.
 Tipping Pages Into a Book
There are many methods used for tipping in, or attaching pages into a book. One of the simplest ways is to simply use brads to attach the artwork into the book. The advantage to this is that the art can be removed later—but the down side is that you’re adding a design element to the front of the work. Let’s talk about some permanent methods of attachment that don’t add anything visible to the piece:
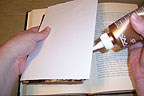
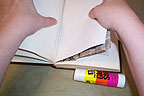
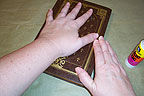
 A very simple way to tip in is to apply a line of glue to the portion of the page that comes in contact with the spine of the book. In the case of my folded set, that would be the fold line, which will be pressed into the spine of the book. Once the glue line has been applied, and the page has been pressed into the spine of the book, it should be left alone to dry. I often set my pages up to dry straight up, to ensure that only the very fine glue line is attached to the book.
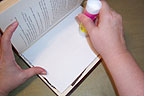
 This same method of attachment can be achieved with a glue stick. Just apply glue to the fold, and press the tip-in into the spine of the book, between pages.
 Glue stick can also be used to apply the tip in to a set of pages. Apply glue to the fold of the tip-in, and to one wrong side, and slip it into the book against the spine. Close the book and press. Open the book, and apply glue to the other wrong side of the tip-in. Press again
 Single tip-ins can be applied in all the ways described above. Just apply glue and press into the spine of the book.
 Single pages can also be applied to a stub, or piece of a page that has been cut close to the spine of the book. Simply trim the page down to roughly 1/2″, then glue the tip-in to the remaining stub. Often, stubs will be made of several pages glued together for extra strength.
 Mailing Tip-Ins
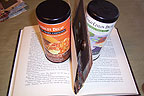
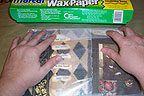
I often wrap my finished tip-ins in waxed paper, to keep them from sticking to either the other pages in the set as they’re waiting to be mailed, or to the mailing envelope in transit. This is particularly important if you have used any acrylics or mediums on your page—they tend to stick, even when completely dry, and especially in warm weather. Sending them wrapped in waxed paper also supplies the person who receives them with paper to tuck between pages once they’ve been glued into a book. Many of my altered books are stored with waxed paper tucked between the pages, to keep them from sticking to each other.
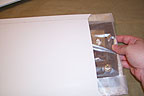 Rigid cardboard mailers are ideal for insuring that your tip-in arrives in good shape.


