I have a huge collection of rubber stamps, most of them unmounted. I buy unmounted stamps because they usually cost less, and definitely take up less storage space.
There are dozens of ways to deal with unmounted stamps. Here’s my method:
 I mount my rubber stamps on plain old fun foam from the kiddie section of my local craft store. Most stores now carry foam that’s already sticky on one side. If they have sticky foam, I buy that. If not, I buy the plain stuff and run it through my Xyron machine.
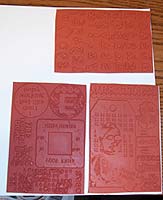
These are quarter sheets of stamps from Paper Artsy. Leandra positions her stamps pretty close together, so I can just slap the whole quarter sheet on the sticky side of the foam and be done with it. Other companies may space their stamps out a bit more, so I’d trim around each stamp, and position it on the foam to limit waste. Either way, the goal is to get the rubber backed with foam.
 Next, I trim around the individual sheets, to make them easier to handle. I work with one sheet at a time, because I want to keep all the stamps that belong to each sheet together. For me, that’s important. I do a lot of work that will be published, and I have to easily identify the stamps, both by manufacturer and sheet. Keeping them together is a must.
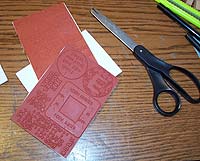
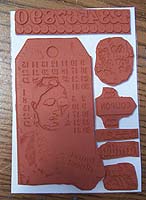
 I trim as close as I can around the individual stamps. The less excess around the outside, the better. Some people use heavy duty scissors for this. Some swear by Kai scissors. I have a pair of crappy scissors that I use to cut gluey things. They do the job, and for rubber that’s not ridiculously thick, they’re just fine.
Again, I’m keeping all the stamps that belong to a single sheet together, because they’re going to be stored together.
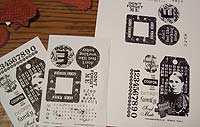 Now let’s talk about indexing. For me, an image of the stamp is crucial. Fortunately, Leandra’s stamps come with a nice index sheet in the package. About half the companies I buy from right now do this, and I love it, because it cuts down on the amount of work I have to do to go from packaged rubber to stamped image on a finished piece. For those stamps that come packaged minus the index sheet, I ink up each stamp and stamp it on a sheet of white bond paper, then proceed using that as my faux index sheet. It’s not as satisfying, but it works.
Now I scan my index sheet, and rearrange the images to fit a 4.75 inch square—the size of a standard CD jewel case. If I’m starting with a pre-printed index sheet, I simply print out one copy of my 4.75 inch square. If I’ve inked the stamps to create an index, I print out two copies—and throw the inked sheet away.
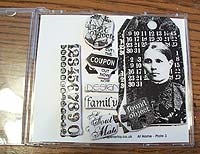
 I’m going to store each quarter sheet in its own jewel case, with a complete index of the stamps on the bottom of the case, and an image on the top of each piece of rubber. My 4.75 inch square of images gets taped to the bottom of the jewel case. I do this because it helps me to quickly see if the stamp I want is out on the table somewhere—if the image is in the bottom of the case, but there’s no rubber on top of it, clearly it’s in use, and I can stop hunting through my clean stamps and start looking through my dirty pile.
 The original index sheet (or the second print, if I had to create one by inking the stamps) is run through my Xyron machine, and adhered to a sheet of clear vinyl. I use upholstery vinyl from the fabric store—the thickest stuff I can find. This creates a clear seal over my stamp, and also is one half of my adhesive system.
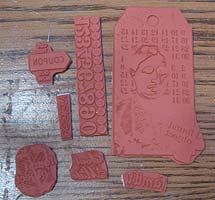
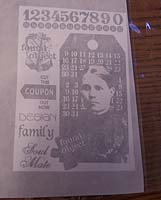
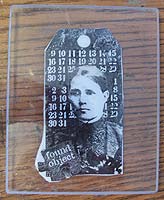
 Here’s one of my quarter sheets, arranged on the back side of an index sheet, ready for trimming. I usually hold the sheet up to the light, and line up my stamps with their image as closely as possible. I usually end up just a little off, but that’s OK. As long as I can tell what stamp it is, and whether it’s right side up, I’m fine.
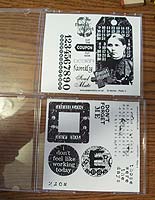
 My trimmed stamps, loaded in the CD case. Each stamp is stored on top of its image. Since these sheets are small, there’s some extra space in the case. For full sized sheets, I generally end up using every inch of 2 or 3 CD cases, with no room to spare.
 CD cases are stored in CD racks mounted to my workroom wall. Here, all my Ink & the Dog stamps are racked together for easy access. I generally store stamps either by company or by theme. For example, I have ten tons of face stamps from various companies—most of those are racked in the same section. Certain companies are racked together, because I use them for published work. This is kind of a weird Lisa Vollrath orgainzing system—I know where the stamps I want are stored, even though it makes absolutely no sense to anyone else.
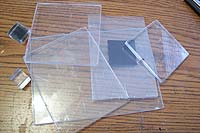 I know by now you’re probably wondering how the heck I use these stamps. Here’s the secret weapon: a big pile of acrylic blocks with vinyl glued to one side. I’ve aquired these from random places: stamp shows, eBay, and the acrylic frame section of my local craft store. Just about anything that’s made of clear acrylic, and heavy enough so that it won’t crack when you push down on it is fair game for a mounting block. Each one of these pieces has had a piece of clear vinyl glued to one side—I just ran the vinyl through my Xyron machine, and stuck it on the acrylic.
 How the stamps work in action: the vinyl on top of the stamp meets the vinyl on the bottom of my acrylic block, and static happens. Enough static to keep the stamp stuck—if it doesn’t stick, I simply rub both pieces against my shirt for a minute, and the static builds up. Seriously, this works—well enough that some days, I can’t get the stamp back off the mounting block without a good tug.
My favorite thing about this system: I can see straight through the mounting block to the edge of my stamp, so lining things up just so becomes a matter of course instead of a big hassle. I can see my paper under there, so if I’m trying to stamp around a particular motif, or aligning the stamp with a pattern on the paper, there’s no guesswork invovled.


