I enjoy making things from old CDs. At the office, we go through quite a few of these during our busiest periods, and unfortunately, once I’ve filled a CDR with files I’m transporting from the PC at home to the Mac at work and back again, there’s really nothing to be done with them other than throw them away. I feel compelled to find ways to incorporate these discards into my artwork.
 Recently, friend and artist Barb Adams posted on Alterations a pic of a CD book she did to fit into an AOL tin. When CD decos came up as a topic on ARTdecos, I decided to try my own version of a CD booklet. Here’s what I did:
Materials:
Old CD
Big scissors – I used 10″ dressmaker shears
Ruler and pencil or marker
Metal tape from the duct section of the hardware store
Cardstock for pages
Xyron machine or adhesive of choice
Stapler or needle and thread
Paints, stamps, tissue paper, embossing powder or decorating tools of your choice
Instructions:
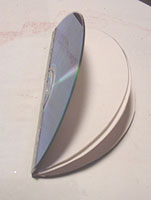
 Draw a line on the front or colored side of an old CD, splitting the circle in half. Cut CD on line. Take your time cutting, and try to do it in one smooth motion rather than short, sawing cuts. Place the two pieces of the CD on your work surface, with the side you’d like to use as your outer covers facing down.
You’ll notice in this picture that the finish seems to be flaking away along my cut edge. Since I was planning to cover this edge with tape, and then paint and collage over it, I didn’t worry about it. Taping along the center of the CD, and then drawing the line and cutting will help this a little. Going in the complete opposite direction, you can also exploit this flaking to remove the silver finish completely, which leaves a clear CD. A light sanding will remove the finish, and leave a frosted effect.
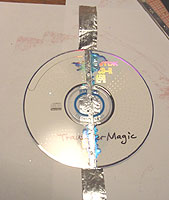 Cut a piece of metal tape at least twice the length of the CD. Place the tape sticky side up on your work surface. Place one half of the CD onto the tape, and position the other piece at least 1/4″ away from it, as shown. This gap will allow your CD book to close with a minimal number of pages inside. If you plan on more pages, leave a bigger gap.
 Fold the tails of the tape over the top and bottom of the CD, covering the spine. Let the tape overlap a bit, and trim the excess away. Burnish the tape to the CDs with your thumbnail.
 Make pages for your CD booklet by laying the taped CD on some cardstock and tracing around it. I made three circles for mine, folded them in half, and stapled on the spine so the flat part of the staple was at the center of my booklet, and the raw parts would be enclosed by the cover. Once I had assembled my signature, I ran it through my Xyron machine and inserted it into the covers. I like this method, because it finishes the inside covers of the booklet. Trim page edges as necessary.
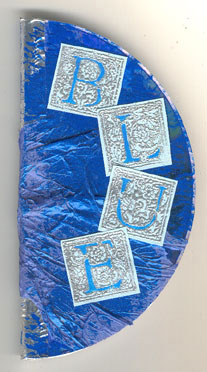
Decorate your finished booklet. For my example, I crumpled tissue and glued it to the exterior of the CD, then painted over it with blue Lumieres. The title was added with letter stamps embossed in silver and colored with markers.


