 I love finding old, decaying items to use in my artwork, and have a particular fascination with rust—in fact, a lot of the text and photos for this article date all the way back to 1999, when I wrote a similar article for miniature makers. Clearly, it’s a long-term obsession!
Now, the ideal is to find things that have rusted naturally, but that’s not always possible. When Mother Nature hasn’t had her way with something yet, there are various ways to help her along.
A word of caution before we go on: the techniques I describe here all use chemical processes. Take the reasonable safety precautions!
- Wear gloves.
- Work in a well ventilated area.
- Do not breathe fumes.
- Do not allow children in the work area.
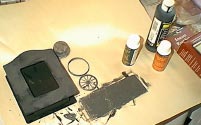
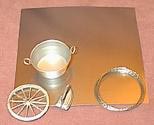 I decided to try a variety of techiques on some items laying around the house, to see what would happen. On the metal side, I raked together a couple of pieces of tin that I bought at my local craft store, some junk metal minis, and some picture wire.
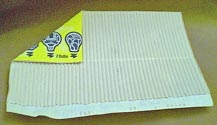 I also included some non-metal items, including a wood box frame, and one of my favorite cheesy art materials—the corrugated cardboard that comes wrapped around lightbulbs. More and more lightbulbs are coming packed in plain cardboard, so this stuff is now a hot commodity. If you come across it, save it!
Here are the techniques I tried:
Technique #1:
Rust on real tin or iron using peroxide and salt.
This technique works on real tin or iron. Be sure your metal has no sealer or finish on it. For this project, I used some lightweight tin craft sheets from my local craft store.
 What you will need:
- Tin or iron pieces
- Hydrogen peroxide – available at any drug store in the first aid section.
- Table salt
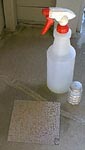
- Spray bottle – I used an old plant mister bottle.
 Working in a well ventilated area, pour the peroxide into the spray bottle. Spray the tin or iron with peroxide, misting generously. While still wet, sprinkle with salt. Rusting should begin almost immediately, and is sort of fun to watch. Allow items to dry completely, and then rub to remove salt. Different effects can be achieved using more or less salt. I also achieved some nice rusting by letting the items dry, and then remisting them with peroxide to start the process all over again. Rinsing the rusted item in cold water removes some of the rust, and gives a smoother surface. This is definitely a technique to experiment with fully before you plunge in with a big piece.
This technique worked great on the tin from the craft store. Nothing happened to the junk metal minis. It took the shine off the picture wire, but didn’t rust it.
Technique #2:
Rust on real tin or iron using vinegar and bleach.
This technique also works on real tin or iron. Be sure your metal has no sealer or finish on it. For this project, I used some tin sheets from my local craft store.
ETA: 12 years after this article was written, some idiot messaged me about this technique, saying it produces toxic gas. I refer you, again, to the safety precautions at the top of the article. Keep your eyes/nose/kids/animals away from the fumes this technique may emit.
 What you will need:
- Tin or iron pieces
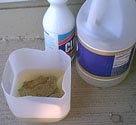
- Household bleach
- Vinegar
- Plastic mixing container – I used the bottom half of a gallon water jug, so I could throw it away when I finished.
 Mix 2 parts bleach to 1 part vinegar in the plastic mixing container. Mix enough to cover whatever you are working on. Drop tin or iron pieces into solution. Wait at least 30 minustes, then carefully remove the items from the solution and let dry. Discard used solution. When items are dry, brush off as much or as little rust as you like to achieve the desired effect. Seal with spray finish—I used a matte spray sealer.
This technique gave a nice crunchy rust finish to my tin pieces. It took the shine off the picture wire, but didn’t rust it. It did nothing to the junk metal minis. I dried my rusted pieces on paper towels, and it gave a great rust finish to the paper—it made me wish I had put some mini newspapers underneath, to age them as well.
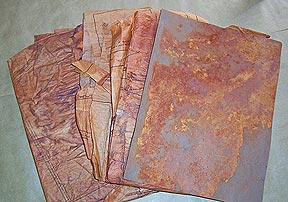
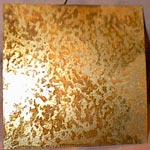
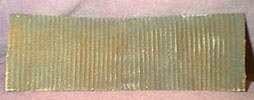
 On that note, here’s some paper that has been created by pressing it between sheets of metal rusted using this technique. Spray the rusty metal sheets with water, lay the paper between them, and walk away. Come back in a few hours and peek. If you like what you see, remove the paper. If it’s not rusty enough, give it another spray. Your mileage may vary, depending on how humid it is where you live.
Technique #3:
Rust on any item using commercial faux finishing products.
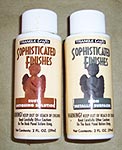 There are several good commercial rusting products on the market. The best known is the one put out by Modern Options called Sophisticated Finishes. Used alone, their Rust will react with iron. They also sell Iron Metal Surfacer, which will coat almost any item with a paint infused with iron flecks, making the surface reactive. With these two products, you can rust virtually anything. Modern Options also makes a variety of other finishes, including my all-time favorite, Patina Green, which creates a wonderful verdigris effect. The one big drawback to these products is the price—the little tiny kit of two bottles I purchased cost $9.99.
 What you will need:
- Sophisticated Finishes Iron Metal Surfacer
- Sophisticated Finishes Rust (I bought a kit that contained both products)
- Paint brushes or sponges
- Paper towels
- A blow dryer, if you are impatient
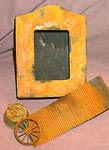 This is pretty simple. Paint your piece with the Iron Surfacer, then wait for it to dry. Don’t worry about getting it on completely even, or about using too little paint—I dry brushed my frame, and got great results. Paint again with the Rust, then wait again. Be aware that the Rust is a reactive agent—it’s actually a liquid chemical compound that is going to react with the flecks of metal in the surfacer. Although this process is significantly faster than Mother Nature, it does take a little time. Don’t worry if you don’t see rust the moment you put Rust on your piece. Walk away. Make a cup of tea.
If the piece is sufficiently rusty after one coat, you’re done. If not, apply more Instant Rust. When the piece is rusty enough, seal with a matte sealer. Be aware that some sealers change the appearance of the rust—this is something you want to test on a spare board before you commit on a piece.
I am not the Princess of Patience, so I use a blow dryer with this stuff. It’s hard to tell how rusty the piece will be until it is completely dry. On the plus side, this will make ANYTHING rusty, as long as it is paintable. It looked great on all the pieces I did, making them very rusty.
Technique #4:
Rust on any item using commercial faux finishing products, peroxide and salt.
 On a whim, I decided to try using the Iron Surfacer as a base coat, and then applied Technique #1 to it—I sprayed it with peroxide, and then sprinkled with salt. The result was a lightly rusted piece, with a great deal of texture from the salt. Rather than remove the salt completely, I left some of it, which made great dirt in my grooves. This might be a good way to cut the cost of using the more expensive prepackaged products, and still get a good result.
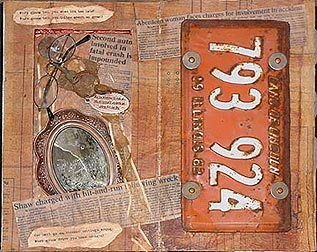 This altered book layout uses a variety of rust techniques. Some of the items, such as the license plate and the some of the metal pieces in the niche, have been rusted by nature. The background papers were created using the rusty metal sheet method described above. Some of the items in the niche have been rusted using commercial products.
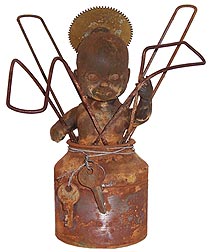
The same is true of the art doll at the top of the page. It’s a metal tea tin that’s been burned to remove the finish, and treated with rust solution. The plastic baby doll body has been painted with surfacer and then treated with rust solution. The iron stakes surrounding the doll were pulled from a muddy vacant lot around the corner—they were rusted by nature, as were the keys hanging in the front of the piece. The metal cord holding the keys was soaked in a vinegar, salt and water solution for a few months—I keep a glass container of rusty things going out in the garage, and just toss stuff into it each time I refill the water.
Now, go rust something!


