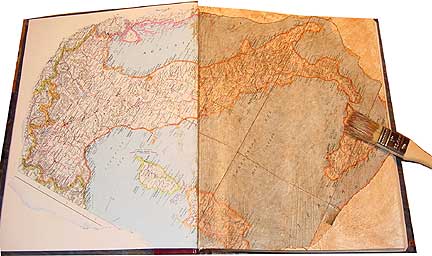
 This is a quick background technique that I use quite a bit. In this example, you’ll see that the map on the left page is quite bright, while the right is sort of a mellow tone of brown. This effect was achieved with some background papers torn from an old atlas, and Burnt Umber Glaze from Golden.
I find that this technique works best when the background paper is anchored down. In this example, I worked in an altered book, so I simply glued the papers to my pages with a glue stick, and let them dry. If you want to create some glazed pages to be anchored later, tape all four edges down to your work surface with long strips of painters tape. This will leave stripes of unglazed paper along your edges that will have to be trimmed away once the paper has dried, but as long as you leave the paper taped down until it’s completely dry, your paper will remain somewhat flat.
I’m pretty bold with my glazing, because usually I’m working with a background paper that’s much too bright. I simply squirt a stripe of glaze across my page, and then use a cheap bristle brush from Home Depot to swipe it over the page. I’m not particularly neat about this—it’s streaky and blotchy unless I manage to work very quickly to even it out. Embrace the streaks and blotches, since real aged papers don’t age evenly. Enhance the uneven color by applying a little extra glaze to the corners and edges.
Experiment with your papers. Torn edges will accept glazes differently than the flat surface of a page. Try collaging torn pieces, then glazing over them. You’ll love the way a coat of glaze seems to pull the color of the papers together—even vastly different papers can work well together when toned with glaze. If one section seems to pop, looking brighter than the others, simply apply a little extra glaze to tone it back.
I own just a couple of bottles of Golden glaze, because they tend to be ridiculously expensive and hard to track down. For me, burnt umber and yellow ochre were a must for aging. I also have metallic bronze, which was an impluse buy, but quite nice when I want to add a shimmer. The best investment I made was a big bottle of clear acrylic glazing liquid—I have gloss, but I think next time around, I’ll go for the matte finish. This clear liquid can be mixed with any cheap acrylic paint to create a glaze. I generally do equal parts of paint to glaze, then test it out—the cheaper the acrylic paint, the less pigment it contains, so the less glaze I need. Expensive acrylics require more glaze to thin them, because they contain more pigment.
Although I love my cheap bristle brushes, this technique can also be applied with a sponge, a paper towel, or for a really nasty textural effect, toilet paper, which disinigrates during application, leaving little blobs of glazed paper behind.


