First, we’ll need some backgrounds. Backgrounds are just what they sound like—something that acts as a surface on which to build your layers. ATC backgrounds can be made of pretty much anything you choose. I generally start with a plain piece of cardstock cut to size (2-1/2 x 3-1/2 inches), and build up. Here’s an assortment of patterned papers, painted text pages, clay tiles and whatever else was laying around on my work table:
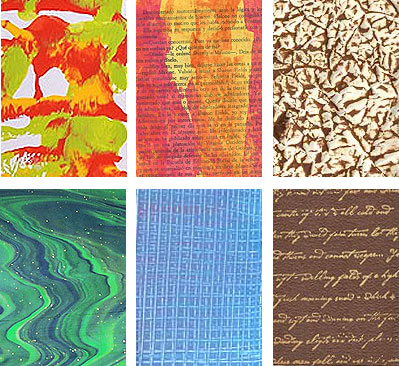
Notice there are no solid backgrounds here? That’s intentional. If it started out solid, I painted over it, stamped it, or did something to add visual interest. Just because it’s a background doesn’t mean it has to be boring!
Sometimes, those basic backgrounds need something, because let’s face it—starting out with just a piece of paper isn’t very exciting. Let’s make some of these basic backgrounds a little more interesting:
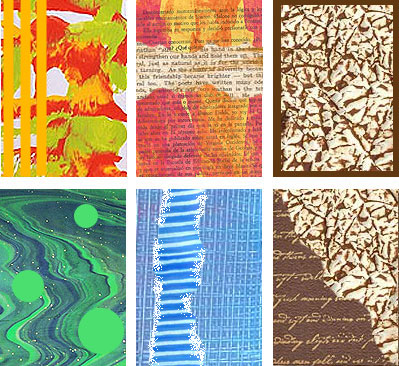
Top left: I added three strips of yellow cardstock. I almost always work in odd numbers rather than even. If I’m going to add something, it will be one, three or five. An art teacher once told me that the eye accepts odd numbers more easily than even. I don’t know if that’s true, but my eye certainly likes them better.
Top center: I added one torn strip of lighter text. Notice on both of these first two cards that my additions don’t split the card into two even halves, but into two different sized sections? That’s another thing most people’s eyes will accept more easily than an exact split in half.
Top right: My favorite thing to do with lightweight background papers is to trim them down slightly smaller, and mount them on a solid color cardstock to create a frame.
Bottom left: I added three dots, just to break up the design a bit.
Bottom center: I added a torn piece of blue, set to one side of the card.
Bottom right: I like to work dark on the bottom, light on the top, so to give this card some light, I added a torn piece of lighter paper to the top right corner.
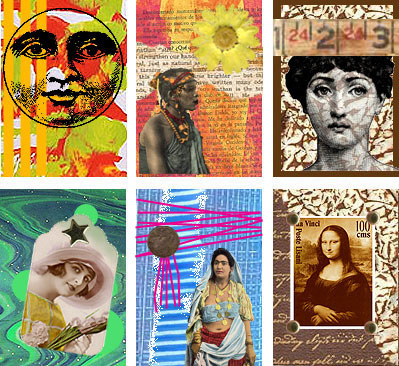
OK, now we have some interesting backgrounds—next come focal images. A focal image is the main image that draws the eye. It’s the thing the viewer should see first. In most collaged cards, it’s a person or thing, so let’s try a few people and things:
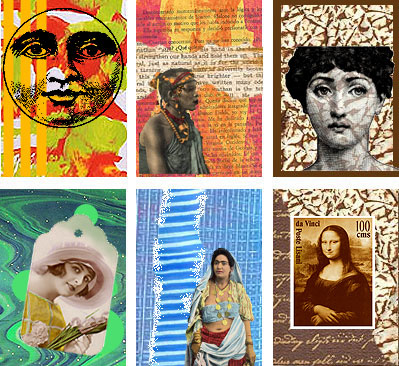
This can be an image rubber stamped directly onto the card like the one at upper left, or stamped onto a transparent paper like the one at upper right. I like to use printed images of people that have been cut away from their backgrounds, like the two center cards. I also grabbed an image on a tag, and one on a faux postage stamp, because focal points can always be things like tags, stamps or other applied pieces. The one thing all these images have in common is that they’re fairly large on the cards, and on each card, there is only one. Pick one big thing to take focus rather than choosing a bunch of little things.
Now it’s time to embellish the card. This is where a lot of people dump everything in their junk drawer onto the card. I try to pick one or two things—or one thing that I use several times:
The key to embellishing is to make sure that whatever you choose is smaller than the focal image, and doesn’t obscure it in any way. So, starting at the top left, the moon face was left unembellished, because that card is already has more than enough stuff going on. Top center, the African girl in one corner gets balanced out by a big yellow daisy in the opposite corner. The stamped image at top right got a strip of measuring tape placed to keep me from wondering where the top of her head went. Lower left, the tag needed a brad in its little hole, and I chose a star shape just for fun. This image is large enough that it doesn’t need much more. Center, the card was wrapped with magenta fibers tied in a knot, and a small coin. Right, I simply added four small brads to the corners of the stamp.
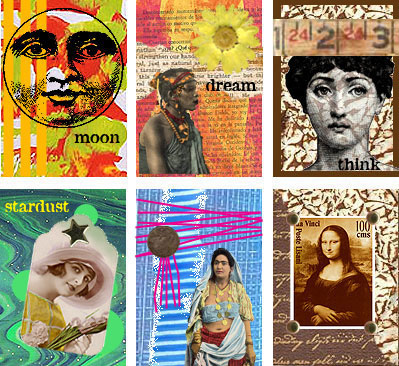
I like to use words on many of my ATCs, so the very last step is to add a word in a convenient empty spot:

There ya go—finished ATCs in just a few easy steps!
(No paper was harmed in the creation of this lesson. These cards were all created digitally!)


